Pages

Thursday, August 26, 2010

Pizza Party


At least once a year, I take on the challenge of making homemade pizza.  Now, I'm not talking about a pre-made dough and some cheese.  I'm talking- get some yeast, make the dough, use a pizza stone, go all out- homemade pizza.  Making pizza from scratch is definitely an art that takes time and practice.  But it's worth it.  And every time I make it, I get a little bit better.

This year's agenda-whole wheat pizza.  Whole wheat flour is a difficult to work with so I used half whole wheat flour and half all purpose flour to make the dough.  You will find millions of recipes online and in cookbooks on how to make the perfect pizza.  In my experience, it all depends on the yeast.  This is the variable that determines all the other factors in your pizza, most importantly time.  Making a dough from scratch could take you all day so be sure you know what type of yeast you are working with, how long it will take, and that you have a proper recipe to follow.  Many traditional cookbooks will use cake yeast (live yeast) which is difficult to find and most likely not what you will be using.  I used a rapid rise dry yeast because I had it in my baking cabinet.  This dough recipe is based on using rapid rise yeast.

Homemade Whole Wheat Pizza

The Dough
1 cup whole wheat flour
1 cup all-purpose flour (+ more for dusting)
1 1/4oz. packet rapid rise yeast
1 Tsp. salt
1 cup of water
2 Tbsp. Olive Oil (Extra virgin is fine)

Sift the dry ingredients together in a bowl.  Heat the water until it's body temperature or a bit hotter. Dry yeast needs warm water to be activated.  If the water is too hot it will kill the yeast and if it's too cool it won't fully activate so the temperature is important.  If you want to be sure, use a thermometer to verify your temperature.  Add the oil to the water and mix the liquids into the dry ingredients.  If necessary, add more flour to absorb any additional moisture.  Take the dough out of the bowl and place it onto a floured surface for kneading.  Knead for about 5 minutes until the dough is well mixed.  Place the dough back in the bowl, cover with a towel and allow it to rise.  Let it rise until it is about double in size (approximately 60 minutes) and then knead it once again to release air bubbles.  Roll the dough out using a rolling pin to fit the size of your pizza stone or baking sheet.  A baking sheet will need to be greased, a pizza stone will not.

If you want to make more than one pizza, cut the dough in half.  I have a pretty large pizza stone so instead of making two or three small pizzas, I made one large pizza with three separate toppings.  The toppings of choice- olive tapenade and ricotta; fresh mozzarella, tomato and basil; and finally tomato, fig and prosciutto.

My best friend had the fig and proscuitto in a pizza shop in a small town in Italy. It was so good she has been dreaming about it since she got back.  It's definitely not a common find in the United States so I decided to give it a go.  No doubt, the combination of salty prosciutto and sweet figs is perfection.  Completely delicious. Even better, it's a perfect bite for those who can't handle cheese.

Toppings
2 Tomatoes, peeled and diced
Fresh Mozzarella
Fresh Basil (Do not used dried basil on pizza)
Olive tapenade
Part Skim Ricotta Cheese
Fresh Figs
Prosciutto

Fresh Tomato, Mozzarella, Basil 


Place the tomatoes and their released juices onto 1/3 pie.  Place mozzarella and shredded basil on top of of the fresh tomatoes.  Salt and pepper to taste.

Fig and Prosciutto

Clean the figs and cut them into smaller pieces.  Spread the remaining fresh tomatoes and their juices over the next 1/3 of the pie.  Top with figs and pieces of prosciutto.  The prosciutto adds plenty of salt so only add additional pepper to taste.

Olive Tapenade and Ricotta

Spread the Olive tapenade over the remaining 1/3 of the pizza using a thick enough coating that the crust underneath is no longer visible.  Place spoonfuls of ricotta on top.  Salt and pepper to taste.

To bake pizza in a conventional oven, set the temperature as high as it will go.  My oven made it to 500 degrees.  The pizza and toppings will take any where from 10 to 20 minutes depending on thickness, ingredients etc so just keep an eye on it.  When the dough is crispy and brown and the cheese is melted and sizzling- it's done!  Serve and enjoy!

Not only am I slowly perfecting my art of pizza making, but it just keeps getting healthier and healthier!

What makes this bite better?
A wheat grain is made up of three parts-the bran, the germ and the endosperm.  Whole wheat flour is made using all three parts of the grain.  Therefore, it has much more fiber and minerals than processed white flour.  White flour is only made from the endosperm, which is the starchy component of the grain.  The bran and germ are stripped away when white flour is made, causing a great lose in nutrient content and fiber.  This recipe is composed of 50% whole wheat flour providing the nutritional benefits of the wheat flour but preventing the pizza from tasting like cardboard.  In addition, the fiber will make you fuller faster so you will eat less.  That's worth a pizza party!

Tuesday, August 24, 2010

What Happened to Summer?!


As I sit here on another gloomy day, not wanting to go outside because it's cold (so weird?!) I feel the need to think about some of my favorite summer moments.  A highlight of this summer was an annual family party at the river filled with food, friends, drinks and....crabs. Crabs are one of my all time favorite summer foods, in my opinion a summer staple.  I cannot go an entire summer with out having at least one crab fest, it just wouldn’t feel right.  There is something special about someone putting down newspaper before I eat, prepping me with lots of paper towels and giving me the option of wearing a bib.  It’s like being a child again.  There is also something completely indigenous about the process. You truly feel like you are surrendering to the human instinct to work for food. Utilizing tools, just like a caveman and tediously and meticulously committed to a hunter/gatherer state of mind.  The extent of most people’s work for food usually includes opening a wrapper or driving through a window.  But, not crabs.  You have to work for those precious little bits of meat, willing to incur injury from intense battle with the claws. And I go at it for hours.

At our recent annual summer party, for fear of my relentless protest, my parents made sure to get crabs.  In addition, we decided it would be best to hide the crabs during the whole party and only bust them out the next day when all the frivolous guests had left, leaving more for the dedicated crab addicts.  Very hospitable, if you ask me.  We actually did the guests a favor, because after you eat crabs you smell like them for at least two days.  So those who aren’t committed to the cause are better off not bothering at all.

My parents’ best friend Richard is the ultimate crab extraordinaire.  He rips the backs off the crabs before he cooks them.  So intense.  This infuses the meat with so much flavor and spice it’s unbelievable.  It also provides quite a deal of entertainment because it’s a guarantee there will be at least two runaways.  He has a secret spice recipe that he wouldn’t share, and I don’t blame him.  Things that good should be kept secret, anticipated, and savored, summer after summer.

Traditional Maryland Blue Claw Summer Crabs

The key is to buy them alive. If you don't have the guts to rip the backs off when they are still crawling, just throw them into steaming hot water, seasoned with a spice bag.  Crabs are bluish-green alive and turn to a bright red when cooked so it's easy to gauge when they are done.  Add a beer or two while they are cooking and some old bay, or your other crab spice of choice.  I have had crabs cooked other ways and I still think the only way to eat them is with crab seasoning.  We all agreed that the tingling of the lips and fingers, paired with a cold beer is what makes them so great.   After pulling them out of the pot, season them again and allow them to cool before digging in!

What makes this bite better?
For me, it isn’t so much the crabs themselves as it is the act of eating them.  If we apply the crab-eating tactic to every meal, we would eat less, enjoy our food more and be more satisfied.  So try to work for your food- buy it, grow it, cook it, put some love into it.  Then sit down with friends and family and enjoy it.  So often we eat on the run, in the midst of chaos and we forget how good even the smallest bite can be if we take the time to savor it.

Monday, August 23, 2010

A Simple Sunday Pasta


Amidst Sunday’s dreary, dreadful weather, all I wanted to do was to hide away in my kitchen and create some savory, satisfying pasta.  After an entire weekend of eating out and ordering in, I was craving a homemade dish, filling yet fresh.  I spent most of the day avoiding the rain and high winds so when the weather broke I decided to take advantage and run to the market before it started to down pour again.  On the list:  mushrooms and fresh part-skim ricotta.  I already had the rest of my ingredients on hand at home.  This dinner was not only going to be delicious, it was going to be cheap. 

I decided to make the sauce using nutmeg and cinnamon.  These spices give the sauce a unique, warm flavor that complements the mushrooms.  I used a can of crushed tomatoes because I had it on hand.  But since fresh summer tomatoes are a plenty right now, you can also dice fresh tomatoes and cook them down until the sauce forms (this will add to your cooking time). The ricotta and fresh basil are the perfect finishing touches to this dish.  I got the basil from a little plant that I grow in my apartment.  It’s great to have fresh herbs readily available.  I don’t exactly have a green thumb and while my basil is not exactly thriving, it’s surviving and I had enough to top of my perfect, simple sunday pasta!

Simple Sunday Pasta
Time: about 30 minutes

Whole Wheat Rigatoni
One white onion, diced
Garlic, about 3 cloves, minced
White button mushrooms, 8oz
One 28oz can crushed tomatoes
1 tsp. nutmeg
½ tsp. cinnamon
1 tsp. salt
Part-Skim Ricotta
Fresh Basil
Olive Oil
Sea Salt
Crushed Black Pepper

Drizzle olive oil and heat over medium.  Add diced onions and minced garlic and cook until translucent.  Add the nutmeg, cinnamon, oregano, salt and sauté briefly to mix.  Add crushed tomatoes and allow simmering for about 10 minutes.  While the sauce is simmering, boil the pasta and prep the mushrooms by cutting the bottoms, cleaning and slicing.  Add the mushrooms to the sauce. Simmer for another 10 minutes to allow the flavors to blend. Note, the longer you let the sauce simmer the better, so don't rush it unless you have to.  When the sauce is finished (give it a few taste tests), add the pasta and toss to coat in the sauce.

Plate the pasta and finish with a scoop of ricotta, fresh basil, sea salt, crushed black pepper and a drizzle of olive oil.

Tip
I love cooking on Sundays and making sure there will be leftovers for the week.  You can make up to one whole box of pasta to accompany this sauce and there will be plenty of ricotta left for future meals.  So make enough for dinner, plus more for a fews days of lunch or a busy weeknight when you won't have time to cook. 

What makes this bite better?
Again, no meat. This meal is a testament to the fact that you can have a fulfilling, satisfying meal without meat.  Notice a trend?  I really try to regulate my meat intake.  I’m not a vegetarian or an animal activist and I don’t like extremists.  I like balance.  But meat in the United States is so highly processed and often contaminated with antibiotics and hormones that I definitely put it on my list of things to eat as scarcely.  I save my meat eating endeavors for when I can afford organic or all-natural meat, or I make the indulgence rare. Want to learn ore about how meat is produced and regulated in the United States?  Check out a relevant documentary on today's food system, Food Inc, featuring Eric Schlosser and Michael Pollan, two experts on the issue.   A warning in advance- be ready to give up your McDonald’s addiction. 

Friday, August 20, 2010

A Toast to Friday!


On a summer Friday, there is nothing better than refreshing, sparkling sangria to welcome the weekend.  Delicious summer peaches are everywhere right now and they are the perfect choice for this summer cocktail.  I used donut peaches because they are a bit sweeter than white or regular peaches and they are smaller  (they look just like donuts!) so they cut into perfect bite size pieces.  However, any sweet summer peach will work.

In Spain, traditional sangria is made by coating pieces of fruit in sugar.  The fruit is set to marinate, allowing the juices of the fruit to seep out.  However, I think covering summer peaches in sugar is insulting; like telling the peaches I don’t think they are sweet enough.  Instead, I marinate the pieces of fruit in organic, all natural apple juice.  Note, this means no added sugar, and not from concentrate.  Any all-natural fruit juice will work but be sure that the flavor profile matches the fruit.  

Now for the good stuff.  As we all know, the alcohol is what defines a good cocktail.  My best friend Gabby works for Mionetto Prosecco and it’s the only sparkling wine I drink.  It’s the perfect bottle to always have on hand.  It goes well with almost every food, it’s a crowd pleaser and it’s the best mixer to use to create cocktails.  Prosecco is better than champagne, especially during the summer, because it is fruiter and has bigger bubbles making it wonderfully refreshing.  For this sparkling cocktail, I used the Mionetto Prosecco Brut because its hint of apple aligns nicely with the peaches and it’s perfectly balanced.   By using a sparkling wine instead of a still wine, you eliminate the need to carbonate the sangria with a sugary soda.

The final step in creating sangria is the brandy. I had no idea Brandy was a key ingredient in sangria until Gabby and I took a cooking class in Barcelona, where we learned how to make traditional sangria.  To measure the perfect amount of brandy you pour the brandy around the edge of the pitcher about 2 to 3 times.  I’ll stick with this tradition, and add the brandy as the final touch to this delicious drink.  Cheers to a wonderful weekend!
  
Sparkling Peach Sangria
Makes about 1 Liter
Time: 20 minutes to prep and prepare + 1 hour to marinate


3 donut peaches
1 granny smith apple
1-cup organic all-natural apple juice
1 bottle of Mionetto Prosecco Brut, chilled
Brandy, about ¼ cup

Cut the fruit into bite size pieces.  Pour fruit juice over the fruit and allow it to marinate for at least an hour.  Add Mionetto Prosecco, pouring slowly so the bubbles do not overflow. Top off with the brandy and stir to mix.  Scoop fruit into each glass and pour the sparkling sangria over. 


What makes this bite better?
By cutting out all the added sugar of traditional sangria, this drink is just as sweet but not too sugary.  In addition, moderate alcohol consumption (which is defined as one drink per day for women and two per day for men) has been shown to significantly reduce the risk of cardiovascular disease.  Adding fruit also ups the antioxidant power!  I’ll drink to that.

Thursday, August 19, 2010

Attack of the Giant Carrots!

As I was strolling along at the greenmarket, scoping out my veggie picks for the week, some enormous carrots caught my eye.  I mean honestly, these things could have given bugs bunny a run for his money.  They were huge!  I couldn’t’ resist the urge to pick them up and revel at the size of them.  I bought them for their sheer comical value. My roommate actually took the biggest one and gave it to her boss as a birthday joke!

I usually don’t cook carrots until the weather cools down.  I love warm savory carrots with cinnamon or as a staple in soups.  However, I had these huge carrots and I needed a delicious summer dish to use them in.  So, I called my sister and sent her on a mission.  My sister is one of the main reasons why I love food and cooking. She watches the food network 24 hours a day and when she was 8, she insisted on that our new puppy be named after her favorite chef.   To say that a passion for food runs in the family is an understatement.

My only request for her dish was that it be a summer salad and of course, healthy.  Carrots are great year round and are very inexpensive.  Therefore, I also wanted a dish where the carrots were the main ingredient.  I wanted these big carrots to stand on their own….because they literally probably could have.

Instead of a heavy coleslaw or fattening potato salad, tote this light, yummy salad to your end of summer parties!!!

What makes this bite better?
Carrots are a great source of beta-carotene, which is needed by the body to make Vitamin A.  No beta-carotene, no Vitamin A. Vitamin A is a fat-soluble vitamin that plays a critical role in healthy vision! Your eyes will thank you.  In addition to other important roles in the body, both Vitamin A and Beta-carotene may help prevent cancer. Good stuff! 


Julie’s Summer Carrot Salad with Golden Raisins
Double or Triple recipe as needed
Serving Size: 2 cups
Time: About 25 minutes


2 cups of freshly grated summer carrots
1 Tbsp. Lemon Juice (ideally from a fresh lemon)
1 tsp. freshly grated ginger (if you only have dried use about 1/3 tsp. )
1 Tbsp. honey
1 Tbsp. apple cider vinegar
2 Tbsp. Spicy Brown mustard (Dijon will work also)
2 Tbsp. olive oil
½ cup of golden raisins
1/4 of a small yellow onion , diced
Parsley, cleaned and chopped, about 1 Tbsp., more to taste
Salt to taste

Peel and rinse the carrots.  Grate them to produce a coleslaw-like texture.  Add lemon juice, ginger, onion and set aside.  To prepare the dressing, whisk together honey, apple cider vinegar, spicy brown mustard and olive oil.  Toss into carrots and mix well.  Add the golden raisins and the parsley and toss again to blend the ingredients thoroughly.   Salt to taste.  Allow the salad to marinate, so the flavors can blend for at least 10 minutes before serving.  Before serving, toss again to remix the salad and sprinkle extra fresh parsley and raisins on top. 

Tip
Whenever you do not have fresh herbs or spices on hand (in this recipe, the ginger) you can generally substitute the dried version with about 1/3 of the amount.  The fresh herbs to dried herb ratio is around 3:1 because the fresh version holds more water and the flavor of the dried herb is more condensed.   However, dried herbs lose their flavor fast and are generally good for only about 6 months.  If you have had them longer then you might need to use more to obtain the level of flavor you are looking for.  Fresh is always better!  They have a more pure flavor and better nutrient retention!

Wednesday, August 18, 2010

A Berry Good Breakfast


I used to hate oatmeal when I was little.  Food texture is really important to me and I have a hard time enjoying foods with mushy, goopy textures-like oatmeal.   However, it’s healthy, cheap, fast and super fun to add stuff to, so I decided to battle through my dislike and give it a go. I plugged away for a few mornings until I concocted a few delicious recipes and now I love it! 

This upgraded oatmeal uses fresh summer berries, obviously all in season, and low fat vanilla almond milk.  If you have never tried almond milk before, it is really tasty, gives the oatmeal a nice flavor and is a great solution for those with lactose sensitive bellies.   Sliced almonds and drizzled honey give this breakfast perfect hints of sweetness and texture.  

What makes this bite better?
Oats are a great source of soluble and insoluble fiber.  Soluble fiber is important in slowing down the digestion of starches (which means it prevents spikes in your blood sugar levels) and is linked to lowering cholesterol.  Insoluble fiber is an important asset to your digestive system.  Let's just say, it keeps things moving!  Also, by adding the fruit and sweetening with honey you avoid the tons of processed ingredients and sugar that comes in those packets!

Berry Oatmeal
Makes one breakfast serving
*Note:  Based on the normal package size for these ingredients you should be able to make at least 4 breakfasts

One Half Cup Oats
Three-fourths cup of Low-fat Vanilla almond milk 
Berries- any kind you like! I used blackberries, blueberries and raspberries
Sprinkling of Sliced Almonds, about 2 tbsp.
Drizzling of Honey, about 1 Tbsp.

My trick for getting the oats to stay firm and not turn to mush is to heat them for about half of the recommended time.  Add the almond milk to the oats and heat for one minute in the microwave.  Then stir and heat for another 30 seconds.  Sprinkle the berries and almonds on top and finish with a drizzle of honey.  What a great way to start your day!

Tip
Be sure to monitor your oatmeal in the microwave.  If you over heat it, it will overflow out of the bowl and go all over!  This is the last thing you need on a Monday morning!

Other Variations
When berries go out of season (or get too expensive!)  try this with apples, cinnamon and walnuts! 

Tuesday, August 17, 2010

An Eggs-traordinary Dilemma


Today I wasted 45 minutes of my life trying to buy eggs.  I am 25 years old and undoubtedly have purchased plenty of eggs.  Yet, without fail, I go through the same dilemma every single time I stand in front of the endless cartons.  Organic? Cage-free?  Free-range? Certified Humane? Conventional?

Unfortunately, most people do not have the dilemma that I do, because they are unaware of the issues surrounding eggs and probably have not even noticed the plethora of labels, certifications and proclamations stickered all over the cartons. This NY Times article, published last week, illuminates the debate on inhumane farming of animals and focuses on the caging and inhumane treatment of hens.

Marion Nestle’s book What to Eat has long been an authority on how I buy food.   She serves as my guide on this issue as she reviews the major egg certifications and nutritional content of eggs.   Here is the breakdown:

USDA Certified Organic:  Hens must be fed organic feed, allowed to go outside and have access to sunlight. Farms undergo inspection to ensure regulation is being followed.  

Certified Humane/Cage-Free/Free-Range: These can be nestled into the same category.  Hens must be treated using humane farming conditions, with access to sunlight and outside roaming space.  The regulation on feed is not as strict as organic.  

United Egg Producers Certified: This indicates that the eggs are produced in a commercially “kind” way.   Basically meaning, hens raised under this certification are only ensured easy access to food and water, most likely from their cages

Conventional: Hens are caged and eggs produced are not organic. It has also been suggested by various sources that these conditions are more likely to breed disease. Conventional production prides itself on efficiency to keep costs low.  

Nutritional Content: The nutritional content of eggs does not vary depending on certification.  The nutritional content of eggs can be upped if the feed is fortified (ie. omega-3 or extra vitamins) but in my opinion you're better off getting the nutrients from another food source and should not buy eggs based on these claims

When you are buying food, it is important to remember that an entire industry backs whatever product you are buying- eggs, dairy, chicken, meat, etc.  And industry supports profit, not always what is best for the consumer.  However, in the same light, industry responds to demand.  And if people are demanding humane treatment of animals and organic production of food (re: the NY Times article), then that is the way the industry will go. Right now, an overwhelming 98% of people purchase conventional eggs. 

So, the next time you go to buy eggs or anything for that matter, take a minute to think before you fly on to the next thing on your list.  Every time you purchase a food product- you are voting.  You vote for how you think animals should be treated; for how famers should be paid; for how food should be produced; for what you want to put in your body to fuel your health. Regardless of your final decision, it’s worth the second thought.


Monday, August 16, 2010

Tasty Tomatillo Salsa


Every week I go to the greenmarket and pick out something I have never made before.  This week’s pick-tomatillos!  These little guys are so cute!  Tomatillos are about the size of a golf ball, covered in a greenish husk and inside have the appearance of an unripe, green tomato.  My farmer seemed so excited about them that I couldn’t resist.  I also grabbed one of his jalapenos and decided I would make a delicious tomatillo salsa. Tomatillos are the base of most green sauces in Mexican cooking and can be cooked in a dish produce a mild flavor or can be blended raw to produce a more boldly flavored salsa.  I’m feeling bold, so I’m going with the salsa!

What makes this bite better?
Whenever you can top off a dish with a fresh, flavorful, healthy salsa you replace more fattening option such as cheese, sour cream, butter or extra salt!

A wise warning before you start- I have cut many a jalapeno and have never met one as aggressive as the one I used in this recipe. Jalapenos contain capsaicin oil- that is what gives the addictive, warm burning sensation to its dishes.  However, it can also have the same effect on your skin and if you’re even more unlucky- your eyes. 

Now, if you have sensitive skin, you should wear gloves when cutting jalapenos.  Since jalapenos normally don’t bother my skin I did not wear gloves (mistake #1).  I cut my jalapeno, cleaned out the inside and the seeds and diced one or two slices to throw into the salsa.  Then, I immediately washed my hands following jalapeno protocol.  However, some of the oils must have remained somewhere on my hands, my knife, my cutting board, the counter; I don't know where but it was there somewhere (mistake #2).  I will reiterate how “aggressive” this little pepper was.  After a few minutes, I began to feel a burning sensation on my face. I must have touched my face-even if I did so unconsciously (mistake #3).  My tomatillo salsa, at this point complete, stared up from the jar mocking me.  

After a few face washes and a bit more time for the pepper to prove its point, the sensation went away.  Looking back it could have been much worse. But hey, some of us have to learn the hard way!

Lessons learned
#1 Wear gloves when cutting jalapenos
#2 Wash your hands, gloves and everything that came in contact with the pepper
#3 Never underestimate a jalapeno, even if you have encountered many harmless ones before


Tomatillo Salsa
Makes about 16oz.
Time: 10 minutes or less

Tomatillos- about one dozen
1 Jalapeno- amount based on spice preference
1 quarter of a small yellow onion 
3 pieces of Garlic
Salt

To prep the tomatillos remove the outer husk and wash them thoroughly.  They have a sticky feel when you remove the husk, so be sure to wash them well!  Once the tomatillos are prepped, quarter them and add to the food processor.  Cut and peel the garlic and onion and add to the food processor as well.  The jalapeno will control the heat so add as much or as little as you want.  Jalapenos hold most of their heat in the inside membrane and seeds so to make a more mild salsa only use the outer part of the pepper.  You can get a nice kick by adding one or two slivers of the pepper. Blend the ingredients together until a salsa forms.  To control the heat and flavor, taste as you go!


Serving Suggestions
Eat alone as a salsa with tortilla chips.  Serve over grilled fish, shrimp, chicken or steak.  Top off a delicious taco or salad or blend with an avocado to make a yummy guacamole!

Storage
Place salsa in a jar and store for up to one week in the refrigerator. 

Friday, August 13, 2010

Friday's Food for Thought


If you want to live better, you need to eat better. If you want to eat better, you need to learn to cook.  This is a wellness principle I strongly believe in.  Even if you don’t plan on cooking every meal, everyday, cooking increases your understanding of food in general, arming you with a set of skills to help you eat better.  Believe me, once you make Fettuccini Alfredo or a Flourless Chocolate cake from scratch your whole understanding of food changes.

When learning to cook, don’t set up the expectation that you need to be Mario Batali or Anthony Bourdain (even though that's not a bad goal...they are two of my favorites!).   You just need to be apt enough in the kitchen that you can come out alive, with a dish that’s edible and good for you.  Start at step 1.  Remember one bite at a time!

My Cooking Philosophy

I believe in a messy kitchen and my mom hates this about me.  But for me, a kitchen is an area in which to explore and experiment.  I use recipes for inspiration but I never follow them.  I pick a random food I have never made before and learn how to cook it.  I experiment with herbs and spices and sauces.  I take my favorite restaurant dish and try to recreate it or give it my own spin (check out my best friend Lauren’s Italian cooking blog to see her recreation of her fav!).  All of this helps me learn about food in a meaningful way.  When you are cooking, you should be learning something, not just producing a final dish.  Like anything in life, if you don’t try you’ll never learn.  And if you don’t make mistakes, you won’t get better.

So take some time this weekend to make a mess of your kitchen.  Pick a random food, or spice, or dish you have been meaning to try or have never made before, and go to town!  A little food spontaneity is just what you need to spice up your weekend!  Happy Friday!


Wednesday, August 11, 2010

Summer Sweetness

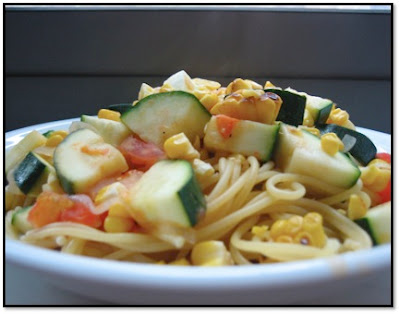
Food is like fashion.  As Heidi would say “You're either in, or you're out.”  And right now, zucchini, tomatoes and corn are "in."  These are some of my most favorite summer veggies and the goods I have been getting from the greenmarket have been unreal! I am in denial about the rapidly approaching end of summer, and in an effort to savor all the sweet flavors of summer cooking, I created this dish.  This simple summer pasta, made with peak seasonal ingredients, is easy, fast, cheap, healthy and super yummy!   If you think I'm crazy for using corn in pasta. Try it.  I dare you.


What makes this “bite” better?
Seasonal ingredients are usually the highest quality, have the best flavor and are the most sustainable.  If it's in season, it probably didn't have to be flown across the country to get to your table.  Also, if you are eating what is in season, then you are guaranteeing a nice variety in your diet. Nutrient intake from a variety of foods ensures optimal health and eating what is “in” is the best way to make sure you are getting the most nutrients for your bite! Greenmarkets are not always convenient and sometimes when you are barreling through the grocery store, it's hard to remember what is “in” and what is “out.” A guide to the fruits and veggies of each season, like this one, can serve as a go to guide the next time you are stuck in the produce department.  Because no one wants be “out” of food style. 


What you need:
2 medium sized Zucchinis- cut into _ inch circles then quartered
3 medium sized Tomatoes- cut into a large dice
1 small white onion- sliced thin
2 ears of corn (cooked- I usually keep boiled or grilled summer corn on hand because you should cook it the day you buy it)
3 pieces of garlic- diced
Salt 
Pepper
Olive Oil

How to Make it Happen:
1. Drizzle olive oil into the bottom of a skillet
2. Sautee onion and garlic until they are translucent
3. Add the tomatoes to add moisture and deglaze if necessary
4. Add zucchini and cook until tender enough to poke with a fork
5. Add salt and pepper to taste and let simmer until tomatoes are of the desired texture (you can cook this dish quickly and the tomatoes will hold their shape or you can let it simmer for longer and they will break down to form more of a sauce)
6. Cut the corn off the cob and add
7. Toss with Pasta
8. Serve and Enjoy! 


The Bite


Anyone who knows me knows how I feel about food.  Maybe I have invaded your kitchen and nosily hung over your shoulder as you prepared an entire meal.  Maybe you have had the unfortunate pleasure of being with me at a restaurant as I tediously decide what to order. Or maybe you have been the victim of one of my nutritional nuances when you’re drinking a soda or eating a Big Mac. I have an insatiable curiosity and “hunger” if you will, when it comes to learning about food and I love sharing that knowledge with others.  I want to know the what, where, when and why of everything edible.  I am always exploring, experiencing, experimenting or seeking something to tingle my taste buds.  

It’s all because I love food.  And you know what?  I’m not the only one…Everybody loves food.  On a very basic level, we need it to live.  In a more complex way, food defines our cultures, our celebrations, our holidays, our societies and our lifestyles. However, it seems people are starting to lack a true understanding of food and how it relates to health.  Not only am I always focused on food, but it is also important to understand how it affects overall well-being.  The basic principles of eating and wellness are simple.  And if you are like me, and the overwhelming age of technology has stripped you of your attention span, you can only process information in small doses. This idea has served as the foundation of A Better Bite- to present eating and wellness tips in small bites that you can actually chew.   

A Better Bite will explore the way we eat and interact with food.  By sharing cooking, eating, drinking and health tips we can rekindle our love affairs with food, and be healthier.  Ultimately, the idea is that you take each “bite” of information, “digest it” and redefine your culinary consumption, one bite at a time.  

I hope you enjoy every bite!