Pages

Saturday, December 4, 2010

Back to Basics: The Magic of Mirepoix


Mire-what?? Mirepoix.  It's time to brush up on some food basics.  Even seasoned home cooks who use these three main ingredients quite often are unfamiliar with its name.  A mirepoix is made up of onions, carrots and celery.  The ratio is usually two parts onion to one part carrot and one part celery.  It is the foundation of most stocks, stews, soups and sauces.  It is a culinary fundamental, mastered by chefs in the first week of their training, yet a staple most home cooks have no idea about.  During the winter months, especially when stews and soups are in demand, these three ingredients can be a culinary go to to create the perfect dish.  A mirepoix adds flavor and aroma and using a mirepoix eliminates the need to add extra fat, sugar or salt to enhance the flavor.

Keep these three ingredients on hand.  They are probably the most inexpensive vegetables to buy and keep better than most other vegetables.  You can even prepare your mirepoix in large batches, freeze it and use it as you need it.  The quantities below should give you the approximate ratio for a simple soup (lots of recipes to follow!).  The size of the vegetables in the mirepoix are based on the cooking time of the dish. For example, if you will be using the mirepoix for a braise that will cook for hours, the pieces can be larger.  If you are making a soup that will not cook for as long, cut the vegetables in smaller pieces. The pieces should generally be the same size so they cook uniformly.


Can't figure out what to cook?!
Mirepoix + stock + additional vegetables + protein= a perfect, healthy soup!


Mirepoix

2 small white onions
1 large carrot
2 stalks celery


Wednesday, November 24, 2010

Turkey Tip #3

Turkey Tip #3:  Keep it Balanced

If you look at the basics of a Thanksgiving meal, it doesn't look all that bad.  Turkey is a wonderful source of lean protein and cranberry sauce is packed with antioxidants.  Even red wine has its health benefits.  It's once we hit the mash potatoes and gravy and skip the greens and salad that we go down hill.  Just like any other meal, keep your Thanksgiving meal balanced.  Make some room on your Thanksgiving table for some delicious, yet healthy options. Eat veggies and healthy grains along with your Turkey and keep the sugar and starchy carbs to a minimum. You will have a fantastic and healthy meal.  And even better, you won't have to feel bad about your extensive dessert sampling.

These sides are a great way to balance out a Thanksgiving table and they will put your stuffing and mash potatoes to shame.  Quinoa is a wonderful grain that is also high protein (a complete source of all the amino acids!) and has a unique nutty flavor.  In addition to being a power vegetable, Brussels sprouts can be a substitute for baby potatoes or a greens topped with cheese (hint: no broccoli with cheese sauce). In addition to being very easy to prepare, these dishes are vegetarian so they will take the pressure off worrying about  an unknown guests dietary needs. What you didn't know your son's new girlfriend was vegetarian?!

Baked Brussels Sprouts with Walnuts


1 lb. Brussel sprouts
1/4 cup chopped walnuts
1 tbsp. Olive Oil
1 tsp. honey
Sea Salt

Clean the brussel sprouts and bring a pot of water to a boil.  Blanch the brussels sprouts by boiling for about 3 minutes then removing and immediately submerging in a bowl of ice water. Remove and drain on a towel. This step can be done in advance, even the day before.

Add the brussels sprouts to a baking sheet.  Add walnuts and 1 tablespoon of olive oil.  Sprinkle sea salt.  Toss to coat.  Bake at 350 degrees for about 10 minutes, occasionally tossing to cook evenly on all sides. Remove, finish by tossing with 1 teaspoon of honey.

Quinoa with Almonds and Golden Raisins


1 cup red quinoa
1tbsp. olive oil
1 1/2 cup water
1/4 cup slivered almonds
1/4 cup golden raisins

In a pot, bring olive oil to medium heat.  Add quinoa and stir to coat evenly.  Raise to high heat and add water until it comes to a boil.  Once at a boil, reduce heat to a simmer and cover.  Allow to cook until all the water has been absorbed, about 20-25 minutes.  Remove the lid and add slivered almonds and golden raisins.  Toss and allow to sit for about 5 minutes before serving. Enjoy :)

Turkey Tip #2

Turkey Tip #2:  Remember Portion Size
Even the healthiest of us can not resist stuffing and gravy on Thanksgiving.  Try to tell me not to eat a piece of pumpkin pie?  It won't be pretty.  We are going to eat our favorites during the holidays and pretending to restrict yourself or worse, feeling guilty about it, is going to wind up back firing.  Instead of denying yourself or over indulging, remember that portion size is a great way to regulate calorie intake.  We all know that after three bites of pumpkin bite we are happy.  But then we think of poor children in a far away country, or the calorie race we are having against our cousin, and for some reason we feel like we need to eat the whole dang thing.  Put the fork down.  Eat what you want- in moderation.  Indulge, but do so until you have had enough, not until you've had so much you can't move out of your seat.


These pumpkin pie bites will help you resist temptation.  You won't even need to cut yourself a smaller piece because these little guys are small enough.  They are the perfect size to get in all the Thanksgiving flavor required, but not so large that they will break your belt.

Pumpkin Pie Bites
Makes about 24

1 regular cupcake pan
Cooking spray
Flour (preferably whole wheat)
Pie Crust Dough (from a box or homemade just not pre-made)
Pumpkin Pie Filling
Nutmeg, Cinnamon and Brown sugar for finishing

Prepare the pie dough and the pumpkin pie filling.  For this recipe I prepared Libby's pumpkin pie filling using the 30 oz can and substituting low fat evaporated milk in place of regular.  Spray the cupcake pan with cooking spray and smear with a paper towel to ensure even coating.  Sprinkle flour in each cupcake mold and then shake the pan to make sure the flour has evenly coated each mold.  Flip the pan upside down and tap to remove any excess flour.  Form the dough into tiny balls about 1 inch in size.  Place one ball in each mold.  Press the dough into the bottom of each mold to form the crust.  Allow the dough to reach up the sides of the molds as well.  Fill the molds with the pumpkin pie filling (about 2 tablespoons).

Bake for 15 minutes at 425 degrees, then lower the heat to 350 degrees and bake for an additional 20 minutes.  Do not follow the instructions on the pie box or the pumpkin filling.  The temperatures needed to be adjust due to the small size.  Insert a toothpick and if it comes out clean, remove from the oven.  Allow to cool for about 30 minutes.  Remove from the pan by using a sharp knife to go around the sides of each pie.  This will allow for easy removal.  Place onto a plate.  Finish with a sprinkle of cinnamon, nutmeg and brown sugar.  Allow to cool completely.  Refrigerate or serve.  Enjoy :)

Monday, November 22, 2010

How Big is Your Turkey?

In America we kick off the holiday season with the most indulgent day we could possibly muster up.  I can guarantee that the Pilgrims and Indians did not fill themselves to the brim with turkey, stuffing and alcohol.  But I personally think it's a shame they missed all the fun of a modern day Thanksgiving.  Thanksgiving is my favorite holiday.  It trumps Christmas and New Year's and obviously, Halloween.  Every year I spend it with the best people, eat the best food and drink more wine than most people find acceptable.  However, there are a few rules that I try to maintain so I don't pack on 15 pounds in a single sitting. For the next few days leading up to the big celebration, I will share my tips and some recipes, for making your Thanksgiving a better one!

Turkey Tip #1: Cook real food and eat real food

I recently had the pleasure of listening to Anthony Bourdain speak and even though his points were many and his extreme humor distracting, he did share one particular point that stuck with me.  He said:

"Food is personal.  People are telling you something about themselves when they offer you food."

I think this message is extremely relevant, especially around the holidays.  Aunt Sally's cheez whiz and crackers do not constitute real food.  Do not be the person who shows up to a holiday gathering with a tin of processed popcorn or dips in containers.  Send the message that you are happy to spend the holidays with people you care about; that you are happy to share real, delicious food. Savoring bites of food that were not only prepared from scratch but prepared with love will keep you more satiated than a box of Entenmann's.  Likewise, put a little love into the dish you bring to your Thanksgiving table or share with your family.  After all, you will be sending them a special message about what they mean to you during the holiday season.

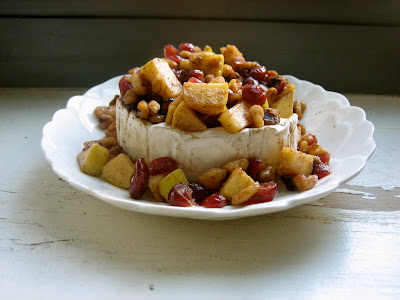
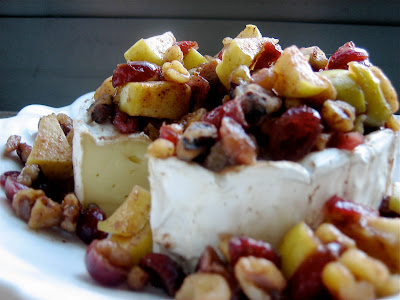
This dish represents all the wonderful flavors of fall- walnuts, apples and cranberries.  However, it is easy to prepare and can even be done in advanced.  I used to bake this dish but the brie gets too oily and we all know how precious oven space is on Turkey Day.  Now, instead I make it in a pot on the stove.  If you are spending Thanksgiving in someone else's home you can just reheat it quickly when you arrive, without interfering in their kitchen.  If you are the host, make the topping the day before and reheat quickly to serve the day of.

Brie with Apples, Walnuts and Cranberries

1 wheel of Brie
2 tbsp. honey
1 Golden delicious apple, 1/2 inch dice
1/2 cup chopped walnuts
1/2 cup dried cranberries
1/2 tsp. cinnamon
1/4 tsp. nutmeg
1/4 cup of water
pinch of salt

In a pot, add diced apples and honey.  Heat over low.  Add walnuts, cranberries, cinnamon and nutmeg. Increase the heat to medium-high stirring continuously for about 2-3 minutes.  Then add 1/4 cup water.  Return to a simmer and cook over low heat until the apples are soft and the water has evaporated.  Place the brie on a serving dish or desired plate.  Pour topping over the brie. Serve with crackers or toasted breads.  Enjoy :)

Saturday, November 20, 2010

Tofu Stir Fry


As we approach Thanksgiving and the holiday season, we get more and more limited on free time.  We also get stressed about how we are going to stay thin and prevent holiday gluttony from making us gain 100 pounds.  In honor of holiday preparation, my sister and I decided to commit ourselves to eating healthy until the holiday season hits us with temptations we won't be able to resist (then it will be time to hit the gym!).  This healthy, simple stir fry is the perfect dish to have on hand as the holiday madness approaches. It is vegetarian, so you can save your meat points for Turkey Day and loaded with healthy veggies.  It has an amazing flavor profile, so you won't be tempted to reach for the pumpkin pie, even a day early.

It is really easy to make a stir fry healthy.  They already have tons of vegetables so there is no need to up the anti there.  However, we need to cut the excess oil, high sodium and upgrade the noodles or rice.  To do this, use a flavored oil, like sesame so you won't need to use extra for flavor.  Use a low sodium soy sauce to cut back on the high salt content and substitute whole grain pastas for whatever noodle you are using and brown rice for white rice.  Traditionally, we see whole grain pasta being used for Italian dishes, but they work just as great in Asian dishes- you just dress them up in a different outfit!

Tofu with Bok Choy and Carrots

1 package organic extra firm tofu
1 Tbsp. sesame oil
3 cloves of garlic, mined
1 carrot, julienned (medium)
1 bunch of bok choy, cleaned
1/4 cup low sodium soy sauce
1 tsp. ground ginger
5 oz. whole wheat linguine (about 1/2 box)
Sesame seeds to finish

Rinse the tofu in water, pat to dry and cube into 1/2 inch pieces.  Spray a pan with cooking spray and heat to medium.  Cook the tofu until it is crisp and lightly browned on all sides.  Set aside.

In a pot, bring water to a roaring boil.  Add a drizzle of olive oil and a dash of salt.  Cook the past until al dente.  Drain and set aside.

In a separate pan, heat the sesame oil to medium. Add the minced garlic and saute.  Add the carrots, ginger, soy sauce and mix.  Allow to cook for 3-4 minutes, then add the boy choy.  Mix and allow to cook for about 2-3 minutes until the boy choy is tender.  Add the tofu and continue to cook until well mixed.  Toss in pasta to coat in sauce.  Add an additional drizzle of sesame oil and soy sauce if needed.  Serve in a bowl and sprinkle with sesame seeds to finish.

What makes this bite better?
Making your own stir fry at home is a great way to know how much oil and sodium are being added.  You can never be sure of this information when you order in (but you can safely assume it's a much higher quantity and the ingredients are much lower quality).  Also, even though some places now offer brown rice options, I have yet to see a whole wheat offering as substitute for lo mein or chow fun. You can feel good about eating this upgraded stir fry!

Thursday, November 4, 2010

Fall Overflow


There are a few things I get really excited about during fall.  Along with scarves, lattes and boots, fall fruits top my list.  I honestly can not stop myself from compulsively buying bags of fall fresh apples.  Recently I spent an entire morning at the Union Square market drinking apple cider, buying different types of apples and munching on an apple cider donut. That being said, I always have more apples on hand than I can eat. My plethora of apples leaves me thinking about creative ways to cook them. The thought of delicious crisp fall apples going bad is just too upsetting.

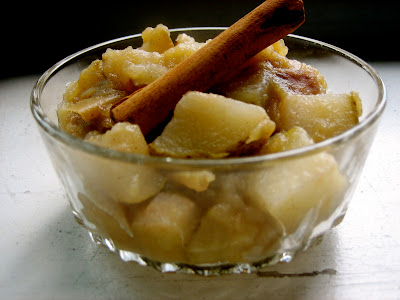
Homemade applesauce is always a perfect way to cook a large amount of apples, especially to preserve the apples.  Applesauce is a great accompaniment to fall dishes like roast pork or baked chicken.  It is also a wonderful topping for a scoop of vanilla ice cream or to blend into oatmeal in the morning. In this recipe, I added some fall pears (another compulsive purchase).  The pears do not break down as easily as the apples so they provides some structure in the applesauce and are ideal if you want to create a chunky sauce.  I keep the skin on both the pears and apples because I like the texture and flavor it provides.  Not to mention, that's where most of the nutrients are located!

Pear Applesauce
6 fall fresh apples (Gala were used in this recipe)
2 pears
1 cinnamon stick
2 tablespoons of honey
1/4 teaspoon of salt
1/2 teaspoon nutmeg
2 cups of water, divided

Clean and dice the apples and pears into an approximately 1 inch dice.  Add the apples, pears and 1 cup of water to a sauce pan and bring to a boil.  Cover and reduce to a simmer.  Allow to cook for about 20 minutes, stirring occasionally.  After most of the water has been absorbed add additional water in small amounts, allowing it fully absorb each time.  Continue to allow the sauce to simmer, adding water and stirring until it cooks down into an ideal texture.  Add the cinnamon stick, honey, salt and nutmeg and simmer for about 10 more minutes.

What makes this bite better?
This homemade applesauce beats a store bought sauce by reducing the amount of added sugar. The honey adds the sweetness without using any additional processed sugar.  Keeping the skin on maintains nutrient content and using pear adds texture and additional flavor.  It is the perfect side to have on hand all fall long.

Sunday, October 31, 2010

Spooky Sweets and Scary Treats

I must begin this by saying that I dislike Halloween.  It is one of my least favorite occasions for celebration.  The pressure of finding a costume and dressing up is a little too intense for my indecisive nature.  I have booked last minute plane tickets to avoid having to create a costume and attend parties.  However, I am obsessed with themed foods that accompany any holiday.  So, while costume shopping and spooky decorations are not my favorite, I will jump at any opportunity to create themed party treats.

These halloween treats are the perfect addition to any ghoulish gathering.  Halloween kicks off holiday season so these snacks were designed to make sure we don't start it off on the wrong foot.  Preparing "bite size" versions of halloween classics provides all the fun with none of the guilt.  And creating healthier snacks ensures that these treats won't scare you out of your skinny jeans and into sweatpants.  

Enjoy....and Happy Halloween!

Spooky S'more Popcorn Balls
1/2 cup popcorn kernels
2 tablespoons vegetable oil
1 package of mini marshmallows
Red and Yellow (or orange) food coloring
1/4 teaspoon salt
1/2 cup of milk chocolate morsels
Wax paper

Pop popcorn (preferably using an air popper or bag of butter free popcorn).  In a large pot, heat vegetable oil over medium.  Add marshmallows and stir constantly until completely melted.  Add salt and food coloring and stir in until well mixed and uniformly colored.  Add popcorn slowly, folding into marshmallow mixture.  Once all the popcorn has been added and mixed in, add the chocolate chips and mix in as well.  Do not allow to remain on the heat for very long after adding the chocolate or the chips will melt completely.  Dump mixture onto wax paper.  Allow to cool for a few minutes but do not allow it to harden.  Using your hands, form the popcorn into balls about the size of a fist.  Allow to cool completely at room temperature.  If not serving immediately, store in an air tight container. 


Ghoulish Gooey Chocolate Cherry Cupcakes
Recipe adapted from An Artful Cupcake By: Marcianne Miller "Chocolate with Cabernet Cupcakes"

1 1/2 cups all-purpose flour
1 cup sugar
1 teaspoon baking soda
1/2 teaspoon baking powder
1 teaspoon salt
1 teaspoon cinnamon
1/2 unsweetened cocoa powder
1/2 cup vegetable oil
1 teaspoon vanilla extract
2 eggs
3/4 cup red wine
Sour cherries

Preheat the oven to 350 degrees.  Sift all the dry ingredients and then add the oil, vanilla, eggs and wine. Beat mixture using an electric mixer for about 3 minutes.  Line mini muffin pans with liners.  Spoon 1 teaspoon of the mixture into the pan.  Add one sour cherry per cupcake.  Top with 1 more teaspoon of batter.  Bake for 8-10 minutes.  Test for doneness by inserting a toothpick.  The cupcakes are done when the toothpick comes out clean.

For extra halloween fun, I decorated these cupcakes with purple and green butter cream icing and painted scary faces and fun halloween phrases onto the cupcakes.

Mini Candy Apples


15 Lady apples
15 lollipop sticks
1 cup Dulce de leche
1 cup milk chocolate, melted
1/2 cup peanuts, chopped

Wash and dry the apples.  Create a space to insert the lollipop stick by inserting a knife into (or right next to) the core.  Insert the lollipop stick.  Heat the dulce de leche in the microwave for 30 seconds and melt the milk chocolate according to the instructions on the package.  Spread 1/2 tablespoon of dulce de leche onto each apple.  Then spread 1/2 tablespoon of melted milk chocolate.  Spreading minimizes the amount of dulce de leche and chocolate that would have been added if the apples were dipped.  Sprinkle peanuts and place onto wax paper.  Refrigerate for at least 30 minutes to allow the chocolate to set. 

Thursday, October 28, 2010

Skinny Sauces, Take 2

Once the first chilly fall day hits, I want nothing more than to eat a warm, savory dish.  Something hearty and creamy with pasta.  The only problem? A delicious pasta with a creamy sauce is often synonymous with fat.   As much as I love big sweaters, I am not too quick to eat food that will force me to spend the fall months hidden under bulky clothes. My solution?  Make a saucy, skinny remix.

One of the classic comfort food dishes loved (and post-consumed hated) by all is fettuccine alfredo.  Find me one person that doesn't like fettuccine alfredo.  Bet you can't do it.  Everyone loves it.  And rightfully so.  Anything with that amount of cream, butter and cheese is sure to please.

Now, find me someone that will eat it wearing nothing but a bathing suit.  Bet you can't do that either.  That stuff makes you feel instantly ten pounds heavier.  And it is always served in a never ending portion.  The second you have filled yourself to the max you immediately regret it. It is the perfect victim for a skinny sauce upgrade.

Most cream sauces are traditionally started with a roux, which is made using flour and fat (usually butter).  Even though fettuccine alfredo is not made using a roux, replicating the texture of a roux is ideal for creating a healthier cream sauce.  In order to do this, I used a cannellini bean puree.  This creates an ideal texture without using butter or cream.  Low-fat milk, garlic and parmesan cheese are the perfect additions to flavor this healthy sauce.

Paglia e Fieno is an italian pasta whose name means straw and hay.  It is a combination of egg tagliatelle and spinach tagliatelle.  Any long thing pasta can be used as a substitute, but try to use a whole wheat or vegetable pasta.

Paglia e Fieno with Parmesan Cannellini Bean Puree

1 can cannellini beans
1 cup 1% milk, divided into 4-1/4 cups plus extra if needed
1 cup of parmesan cheese, additional for finish
3 cloves of garlic, minced
1 tablespoon of olive oil, plus some for finishing
Salt
Pepper
4 bundles of Paglia e Fieno (equivalent to approximately 4 cups cooked)

Rinse the cannellini beans and place them in a food processor.  Add 1 tablespoon of olive oil and 1/4 cup of low fat milk and puree until smooth, adding additional milk if needed.  In a pan, drizzle olive oil and saute garlic. Once the garlic is aromatic and translucent, add the bean puree and continue to heat over medium.  Add additional milk 1/4 cup at a time, whisking until an ideal creamy texture is achieved.  Begin to add parmesan cheese in small portions and whisk.  Add additional milk if the cheese thickens the sauce too much.  Add salt and pepper to taste.

In a pot, bring water to a roaring boil.  Add a pinch of salt, a drizzle of olive oil and add dry pasta.  Boil until al dente.  Drain and place in to a bowl.  Add sauce and mix pasta well.  Serve with fresh shaved parmesan cheese and parsley if desired.

Note:  Bean puree will partially solidify once cooled.  Store left over sauce in a container separate from the pasta.  To reheat, place in a pan and rehydrate with milk or water as needed to reestablish its creamy texture.

What makes this bite better?
Fettuccine Alfredo is a completely indulgent dish that doesn't provide much nutritional value.  Using a bean puree instead of cream and butter not only reduces the amount of fat and calories but also provides the dish with an extra dose of protein and nutrients.  Substituting vegetable pasta instead of regular fettuccine also adds some nutritional points, not to mention color.  Maintaining texture and flavor while swapping loads of calories and fat definitely makes this bite better.

Friday, October 8, 2010

Snack Attack

Being a nutrition student helps keep me on my "healthy" toes.  Sitting in class, watching other students eat their raw vegetables, nuts and salads is great inspiration for making healthy food choices.  But let's be serious.  Most people do not cut up their raw radishes and snack on them to get them through the day.  They don't have time to prepare a fantastic quinoa salad or remember to portion 15 raw almonds in little baggies before they leave in the morning.  As great as this is, it's not always practical.

People require more from a snack.  The purpose of a snack is to keep you fueled from one meal to the next and raw celery stalks are not going to do it for most.  However, snacking can also be a black hole of calories if you are not careful.  Many additional daily calories are consumed outside of regular meals and this caloric excess contributes to obesity.   Here are some of my favorite snacking options to keep you energized, fit into your busy time constraints and help you obtain additional nutrients (remember no "empty calorie" snacks).  Both snacks fit the snack profile you are looking for whether it be crunchy or sweet or savory.

Apples with Almond Butter and Honey
Makes 1 serving


1 Apple, cleaned and quartered
2 Tablespoons Almond Butter
1 Tablespoon Honey

Clean, core and quarter the apple.  Top with 1/2 Tablespoon of almond butter.  Finish with a drizzle of honey.

Rosemary Popcorn with Parmesan Cheese
Makes about 8 cups 

Note: I am obsessed with popcorn so I have an air popper.  However, most people do not.  This recipe follows instructions for stove top popping even though air popping is healthier because it requires less oil. 


1/2 cup popcorn kernels
1 tablespoon vegetable oil
2 tablespoons olive oil
About 1 tablespoon fresh rosemary, cleaned 
1/4 cup grated Parmesan Cheese
Salt to taste

Heat 1 tablespoon of vegetable oil on high heat.  Place one kernel in the oil once it is hot.  Wait until the kernel pops, then add the remaining kernels, tossing in the oil to coat completely.  Place lid on top and remove from heat once popping begins to slow down.  Allow popcorn to finish popping and remove the lid so condensation does not build up.

In a small sauce pan, heat 2 tablespoons of olive oil to medium.  The sprigs of rosemary can remain whole or can be diced, based on preference.  Add the rosemary and saute for a few minutes to allow the flavor of the rosemary to infuse the oil.

Drizzle the oil, alternating with the cheese and tossing the popcorn to coat.  Continue adding rosemary, oil and cheese and tossing.  Add salt to taste and toss one last time.  Portion and store in sealable bags or containers.

Thursday, October 7, 2010

Food for Thought: Where are you from?

Whenever we meet someone new, etiquette prompts us to ask for a name.  Most of the time, we never remember it.  However, the next question asked is almost always "Where are you from?" And for some reason we always remember this bit of information.  I guess it is because it helps give some insight into this new person, perhaps find some common ground and for some, draw premature conclusions.  However you utilize the information is irrelevant.  We always ask.

I have found that this very same question is extremely useful in acting as a guidelines for what to eat.  When debating a food, ask yourself "where is this from?"  If the answer is "a plant," or "an animal" or "a farm," then eat it.  If the answer is "a factory," or "a laboratory" or even worse "I have no idea," then don't eat it. Super simple.  I don't like diets or complicated nutritional information.  It's ineffective and most often confusing and frustrating.  So I have come up with my own tips and tricks for guiding my food choices.

Here is an obvious example.  Think about a diet coke.  Where is that from?  Hmmmm.  Good question.  If I had to guess more than two ingredients in soda I'd be out of luck and I have no idea how they get that taste into the bottle.  If you can't figure out where it's from or how it's made, do not put it in your mouth.

Obvious example on the flip side.  Think about an apple.  Where is that from?  A lovely farm somewhere.  You know exactly what it is, how it was made and that it is beneficial to your body.

A few more examples, just to drive the point home:

Where is....
peanut butter from?   Peanuts. Plant.  Yummy.
a bag of Doritos from?  That cheese is most certainly not real.  Ew.
You get it....

Now, as Halloween and holiday season approach, don't stress yourself out.  You can ask all the questions you want and provide unpleasant information in excess and it still won't stop me from eating a Reese's.  This is simply a guideline to easily help you distinguish between the foods that have a place in your diet, and the foods that should only have a place in your trick-or-treat bag.

Tuesday, October 5, 2010

Skinny Sauces, Take 1


One of my favorite culinary skills to practice is making sauces.  In my opinion, the difference between an average dish and a great dish comes down to the sauce.  That being said, most sauces are not on the top of the healthy list.  For example, a basic roux, which is the fundamental base for most french sauces, is made with flour and butter.  Yummy?  Yes.  Healthy? Not so much. Therefore, I decided to take some time to create some sauces that are healthy and delicious, making them the perfect finishing touches to a dish. 

Chicken with Onions, Capers and a Red Pepper Puree
Makes 2 servings

2 boneless skinless chicken breasts
1 cup low fat plain yogurt
1 jar of roasted red peppers in water
1/4 cup of capers
2 cloves of garlic
1/2 cup of low fat (1%) milk
1 small white onion, sliced thin
Olive oil 
Salt and Pepper, to taste

Marinate the chicken in the yogurt while you prepare the rest of the dish.  Low fat yogurt is a great, healthy marinade.  

In a food processor, blend the roasted red peppers.  Add two cloves of garlic and 1/4 cup of milk and blend again.  Taste and continue to add enough milk until it has calmed down the acidity of the red peppers.  

In a sauce pan, drizzle olive oil and heat to medium.  Gently saute the thinly sliced onions until they are translucent.  Remove the chicken from the yogurt marinade, wiping off most of the yogurt.  Do not rinse and do not worry if some yogurt remains.  Add the chicken to the pan and cook with the onions.  Allow the onions to caramelize as the chicken is cooking.  If needed, add one tablespoon of water to release the caramelized onions from the pan to prevent burning.  This will create a nice browning on the chicken and the onions.  Cook until the chicken is almost cooked throughout.  Add the capers and cook only long enough to crisp the capers and allow the chicken to finish cooking.  Remove all the ingredients from the pan and place on a separate plate.

Add the roasted red pepper puree to the pan, just long enough to allow it to heat throughout and pick up any remaining essence from the onions.  Drizzle over the chicken, onions and capers.  Serve and enjoy :)


What makes this bite better?
People usually associate dry grilled chicken with a healthy diet.  Not yummy.  This dish is a healthy way to spice up a boring piece of chicken and add some flavor.  The red pepper puree not only replaces a more unhealthy sauce made with butter, but adds a serving of veggies and the nutrients that come with it.  Capers naturally add a nice salty flavor preventing you from having to go overboard on the salt.  

Friday, October 1, 2010

Get Saucy


Summer has slipped away but we are not fully ready to welcome fall.  According to the weather and the farmer's market, we just can't seem to make the jump. End of summer vegetables are still lingering in masses as hints of squash and pumpkins begin to make their way into the mix.  This leaves the question on the farmer's market table: what to do with all the ripe end of summer vegetables?!  I happen to have a plethora of tomatoes pilling up.  The answer to my question is obvious. Duh, make tomato sauce.

Now, where I come from there are many debates about who has the best sauce, whether it is called sauce or gravy and what secret ingredients yield the perfect recipe.  In my opinion, it's all a bunch of fluff.  Everyone's answer is always the same- my mom makes the best sauce. And you know what?  Everyone is lying because my mom makes the best sauce.  However, I don't have time to let my sauce simmer for hours like my mom does and I can't put my own mom love in.  Only moms can do that.  So instead, I have a basic recipe that I use as my go to. It's a recipe that is everyone's and no one's.  There is no complexity, no secret ingredients and no extra mom love.  But, it illustrates the simplicity of italian cooking.  When you use fresh ingredients, there is no need for secrets or tricks or fake names because it always comes out perfect.  Freeze it in small bunches to enjoy all winter long.

If you don't have any more fresh tomatoes, use one can of crushed tomatoes (usually 28 oz). Rumor has it, San Marzano tomatoes are the best.

End of Summer Tomato Sauce
Makes 4 about cups

5-6 Summer tomatoes (skins removed,cored and minced)
Basil about 10 leaves, chopped
Garlic about 3 cloves minced
Sugar about 1 teaspoon

Skin, core and mince the tomatoes.  If you don't have the patience to peel the skin when they are raw, plunge them into boiling water for just about one minute.  Allow them to cool and then the skin will be much easier to peel off. Make sure you remove the seeds.

 In a sauce pan, drizzle olive oil and add the minced garlic.  Saute for a few minutes then add the tomatoes including all the juices.  This can get messy but it's part of the fun.  Add sugar, a pinch at a time, testing for flavor.  Add the basil and simmer until the tomatoes have cooked down into a sauce.   The longer the sauce is left to simmer, the thicker and richer the sauce will be.  Cook it to your preference.  Toss whole wheat pasta in the sauce and add extra on top.  Serve and Enjoy!

What makes this bite better?
When holding on to the flavors of a season, the best way to preserve freshness is to freeze the food.  It's a better alternative than buying out of season foods or ones that had to be flown all the way across the world from Chile.  So take your favorite summer veggies, cook them to perfection (or don't) and freeze away.  When you are craving peaches or blueberries or tomatoes in the middle of February, all you will have to do is defrost.

Thursday, September 23, 2010

I'll Take Unknown Grains for 100


One of the things I love most about cooking is exploring new foods, particularly ones I have never cooked before.  Grains, in particular, are usually always exciting and sometimes feel like I am discovering hidden treasure.  This is because grains can provide healthy swaps for other starchy options like rice, pasta or bread.  They up the nutritional value and provide more fiber. In addition to better nutritional value, they often bode unique flavors and textures.  

This week's unknown grain- farro! Farro is an ancient grain that originated in Italy.  It is a whole grain from a farro plant and is similar to barley and spelt.  It should be soaked before cooking and it is cooked as a traditional grain. 

I put my thought wheels into motion and I decided to use farro in a fresh summer salad.  When it comes to salads, texture is key.  I need to have clean flavors, savory elements and lots of crunch.  Cooking the farro and then baking it provides a perfect amount of bite, adds nutrients and fiber.  The farro replaces other starchy options like croutons and adds a nutty, savory flavor the replaces fats in other salads.

If you are a traditional Caesar salad eater, try this salad.  It has a similar flavor profile but is of course, healthier and yummier. The parmigiano reggiano cheese, lemon and olive oil provide the same essence as a caesar dressing without the additional fat.  The string beans and farro add the crunch instead of fried croutons and the corn adds bites of sweetness.  You can use any type of lettuce and I used a mixture of spinach, arugula and mesclun. 

Crisp Summer String Bean Salad with Farro, Corn and Chicken
Makes about 4 servings


2 cups farro (can be prepared days in advanced)
2 boneless chicken breasts, cleaned and thinly sliced
1 pound summer string beans, cleaned and cut into 2 inch pieces
Lettuce, 1 container (about 8 oz or a full head)
1 cup of corn (preferably cut from a summer cob, if not canned will do)
2 Tablespoons apple cider vinegar
1 Tabelspoon lemon juice
2 garlic cloves, minced
Parsley, cleaned and chopped about  2 tbsp.
Olive Oil, 2 tsp plus extra for cooking
1/4 cup Parmigiano Reggiano cheese
Salt 
Pepper

Soak the farro in cold water.  Allow it to soak for at least an hour and you can leave it soak up to overnight.  Bring about 3 cups of water to a boil.  Add the farro and allow the water to return to a boil.  Then cover and reduce to a simmer for about 20 minutes.  Remove from heat and allow to sit for 5 minutes.  Heat the oven to 350 degrees.  Allow farro to cool completely and then spread evenly onto a baking sheet.  Bake for 15-20 minutes, mixing frequently, until the farro has developed a nice crunch.  Do not over cook the farro or it will be impossible to eat.  

Clean and cut the string beans and combine with the corn.  Add 2 tablespoons of apple cider vinegar and set aside to marinate.  

In a pan, drizzle olive oil and heat on medium.  Add minced garlic and saute.  Add chicken strips and allow to cook about 5 minutes.  Add parsley and finish cooking.  Cut open a piece of chicken to test for doneness then immediately remove from heat.  The chicken will continue to cook for a minute or two after it is removed from the heat and there is nothing worse than over cooked, dried out chicken.

Clean and chop the lettuce.  Add parmigiano reggiano cheese, lemon juice and olive oil and toss to coat evenly.   Salt and pepper to taste.  The key to making a good salad is to start by adding half of your ingredients and then test and taste as you go.  You can always add more, but you can't take away oil if you use too much. 

To assemble, add the chicken, corn, string beans and farro to the dressed salad and toss to mix.  Top with additional farro.  Serve and Enjoy :)

What makes this bite better?
The element of exploration!  One of the biggest problems with people's diets is the uniformity and lack of variation.  Diets that have the most variation are the healthiest.  In order to achieve variation, you must be willing to try something new.  If you have never tried farro, give it a go.  If Caesar salad is your all time favorite, it's time to break the bond and reach out to try something new. Who knows, you might just find a new, healthier favorite food.  

Sources:
http://findarticles.com/p/articles/mi_m0820/is_n247/ai_20380028/

Friday, September 17, 2010

Pesto Please

I love cooking easy weeknight dishes where I can get all the components of a meal into one dish.  Having pesto on my mind from Herb Envy, I decided to make a pasta with chicken, string beans and fresh pesto.  The crisp bites of the green beans complement the al dente pasta and fresh herb flavors.  The chicken adds protein and the vibrant green color of the pesto is very appealing.  Pesto has a wonderful ability to make a dish light from the refreshing basil essence while also maintaining a savory element from the oil and cheese.  It's very satisfying and there is nothing better than making fresh pesto and cooking with it right away- amazing.

I used filei pasta because it is more like macaroni and holds the pesto better than other types of pasta.  Plus its an interesting shape and really fun to eat!  If you can't find filei, trofie or rigatoni also work well.

Filei with Chicken, String Beans and Pesto
Makes about 5 servings

3 cups Filei
2 Chicken breasts, cleaned and sliced thin
1/2 pound fresh string beans, cleaned and chopped into 2 inch pieces
2 cloves garlic, finely minced
Olive Oil
1/2 cup Fresh Homemade Pesto (checkout my homemade nut-free pesto)
Parmigiano Reggiano cheese, grate to finish

Heat a pan to medium and drizzle olive oil.  Add garlic and saute.  Add chicken and cook until almost done.  Then add string beans and saute for an additional 2 minutes.  Add the pesto and mix well and allow the ingredients to finish cooking.

At the same time bring a pot of water to a roaring boil.  Add a pinch of salt and a drizzle of olive oil.  Add the pasta and allow it to cook for 4-5 minutes.  The pasta should be al dente, it should be firm but not too crunchy.  Remove it from the stove and drain.

Add the pasta to the pan and mix with the chicken, string beans and pesto.  Finish with a sprinkle of parmigiano reggiano cheese.  Serve and enjoy :)

What makes this bite better?
When people are on a diet the first thing to go is usually fat.  While fat is the least needed macronutrient, it is still important for maintaining optimal health.  Fats are required by the body for cell growth, function and repair.  They also help regulate blood pressure and provide a significant calorie source.  Fats provide 9 calories per gram, whereas protein and carbohydrates provide 4 calories per gram.  This is why adding some fat to your meals will help keep you fuller longer.  The best source of fat is from an unsaturated fat source such as oil or fish.  In this recipe olive oil serves as the fat source, providing the essential fatty acids that the body requires in addition to many other health benefits.  Don't go overboard, but don't be so quick to cut healthy fats from a dish.

Source: Wardlaw G. and Smith, A.  Contemporary Nutrition.  6th edition. New York: McGraw-Hill; 2006.  164-165.

Wednesday, September 15, 2010

Party Pleaser


Figuring out what dish you are going to contribute to a party is always a little stressful. That is why a few sure to please dishes never hurt anyone. This eggplant dip is purely delicious and a perfect contribution to any party.  The presentation can vary based on the type of party and it is always a hit!

I traditionally make this dish with regular eggplant, but I saw some beautiful japanese eggplant at the greenmarket and I couldn't resist. Eggplant should be salted for about 30 minutes before it is cooked.  After it is sliced, sprinkle it with salt and place it in a colander.  Salting helps remove the excess water and bitter flavor in the eggplant.

Eggplant Dip
Time: About 35 minutes
Makes about 3 cups 

1 regular eggplant, sliced about 1/4 inch thick (or 2 smaller eggplants)
2 cloves of garlic, minced
About 1/4 cup fresh basil, chopped 
1 small onion, sliced thin
1/2 cup red wine
Olive Oil, enough for brushing

After the eggplant is sliced and salted, rinse it under water and pat dry with a paper towel.  Brush the eggplant on both sides with olive oil and place it on a baking sheet.  Sprinkle minced garlic, basil, salt and pepper over the eggplant.  Bake at 350 degrees for about 20 minutes.  Make sure the eggplant is soft by poking it with a fork.  

In a pan, drizzle some olive oil, heat over medium and add the onions.  Saute the onions until they are golden brown.  Then, deglaze with the red wine and reduce to about half.  Place the eggplant into a bowl and add the onion-wine mixture.  Smash the mixture together, using a knife if necessary to cut the eggplant skin.  The dip should be smooth enough to spread on a cracker but still maintain some texture.

Serving Suggestions
Spoon dip onto a crostini for a perfect hors d'ouerves or serve as a dip with a multigrain chip or cracker.  The dip is best served at room temperature. 

What makes this bite better?
Everyone knows that parties are the perfect place to binge on foods that you really shouldn't be eating.  This dip is fantastically flavorful and does not have the fat, additives or meats that usually accompany traditional party dishes.  Plus, this dish is vegetarian so any meatless eaters will be able to enjoy as well.  

Sunday, September 12, 2010

Fabulous Fish

I love buying cookbooks.  However, I get easily frustrated when perusing the selection- fast dinners, five ingredients or less, healthy, gourmet, seasonal, holiday entertaining- the list of cookbook claims goes on and on.  I find this irritating because I don't want just one type of recipe for one type of food.  I want it all, all the time.  Every time I prepare food, I think it should be simplistic, delicious and healthy.  And that is exactly what this fantastic fish dish is.  It is amazingly flavorful, super easy and absolutely healthy.  The fresh ingredients along with the parsley pesto create a party in your mouth.  For this preparation I used baby heirloom tomatoes but grape or cherry tomatoes could be substituted.  A mild fish is ideal and I was able to find some delicious fluke at the fish market.  Fluke is a white fish with a thicker filet, mild flavor and nice hearty flake.  However, I have used tilapia, flounder and grouper in the past and all have worked wonderfully as well.  

This dish is perfect if you are cooking for a crowd. It is my go to dish for dinner parties or holidays.  The dish requires very little preparation and everything cooks together in the oven.  You can make the parsley pesto as far in advance as you want because the longer it marinates, the better it is.  Make as many trays as you need based on the number of people.

Fluke with Heirloom Tomatoes, Cannellini Beans and Parsley Pesto

1 pound of fluke, rinsed, patted dry and sprinkled with salt and pepper
1 can of cannellini beans, rinsed
1 package of baby heirloom tomatoes
1 tablespoon of parsley pesto (see recipe from "herb envy")
1 Lemon, slices for the fish and remaining juice

Clean the tomatoes and remove the stems if necessary.  Cut the larger tomatoes in half.  Any tomatoes that are too small to cut in half, leave whole. Mix the cannellini beans and the tomatoes together with the parsley pesto.

Cover a baking sheet with wax paper or aluminum foil leaving excess on both sides to be able to cover the tray.  Place the tomato bean mixture onto the sheet, spreading evenly.  Place the filets of fish over the mixture, spacing them evenly.  Place a lemon slice on each piece of fish and sprinkle the remaining juice from the remaining lemon over the fish. Cover and bake for about 15 minutes at 350 degrees.  Monitor the fish and beans to make sure they do not dry out.  Frozen fish will take longer.  

Serve and Enjoy :)


What makes this bite better?
Essential fatty acids are named as such because they are necessary to maintain optimal health.  The essential fatty acids, omega-3 and omega-6, must be obtained through the diet because the body does not have the ability to make them on its own.  Fish is the best dietary source of essential fatty acids, providing not only omega-6 but also omega-3s (EPA and DHA).  These fatty acids have been known to decrease blood clotting, aid in immune system and nervous system functioning and reduce risk of heart disease.

Wardlaw G. and Smith, A.  Contemporary Nutrition.  6th edition. New York: McGraw-Hill; 2006.  164-165. 

Friday, September 10, 2010

Herb Envy

The weather is cooling down, Labor day has flown by and it is time to savor the last bits of summer.  In order to preserve the essences of summer I am posting three staple recipes made best with fresh summer herbs.  All of my herb recipes are inspired by one of my most favorite places to visit-my best friend Gabby's house in Delaware.

Now normally Delaware is not your go to vacation destination (no offense to the delightful tax free little state).  But Gabby's house has something special, her mom Grace.  Grace is the ultimate cook and her garden puts Better Homes and Garden magazine to shame.  You won't find a better selection of herbs anywhere on the east coast.  We're city girls, so a weekend in suburbia with a big pool, a rose garden and a personal chef is so far removed from a typical weekend that it seems like light years away from New York City.

One of the things I find most frustrating about living in New York City is my lack of ability to have a garden.  Mind you, I definitely do not have a green thumb, but I love cooking with fresh herbs and it is just not as easy (or as fresh) when you have to buy over priced bundles from the supermarket.  I have my little plants growing on the windowsill but when I see Grace's garden I am instantly envious.

When in Delaware, I am always assigned to be on herb duty.  Grace sends me out to cuts tons of fresh herbs from her garden.  The mint for the water.  The basil, lemon thyme, oregano and parsley for dinner.  The rosemary to infuse the olive oil for bread.  And at the end of a beautiful herb filled weekend Grace will send Gabby and I back to New York City, armed with our own little herb plants.  And then without fail, we kill them.  I would say that between Gabby and I we have successfully killed upwards of 10 herbs plants.  Now we don't try to kill them and some resilient plants are still hanging on.  The basil and the rosemary seem to take best to city windowsills.   But there is just something about the city that they resist and even when you can keep them hanging on, it's just not the same.

These recipes are inspired by gardens, by city dwellers who grow plants, and of course, by Grace and her garden.

Basil Pesto
To preserve into the winter months, pour into an ice cube tray and freeze.  Traditional basil pesto is made with pine nuts, but my best friend Erika is allergic so I leave mine nut free.

1 bunch fresh basil
3 cloves of garlic
1/4 cup parmigiano reggiano cheese
Olive oil
salt, sprinkle to taste

Clean and remove the basil leaves.  Place them into the food processor with the other ingredients.  Add the oil slowly to create a nice thick pesto.  You do not want the pesto to be too sauce like.  It should hold form when scooped with a spoon.

Parsley Pesto
To preserve, place in a jar and store in the fridge.  The older it is, the better it is.  And unlike basil pesto, it won't go bad.

1 bunch fresh parsley
3 cloves garlic
1 tablespoon of salt
Olive Oil, about 1/2 cup

Place all the ingredients into a food processor.  There is no need to remove the stems from the parsley, just the bottoms and any pieces that do not look fresh.  Add olive oil as needed to create a nice sauce.  Place into a jar for storing.  Make sure the oil level is higher than the parsley.  If not, pour more oil.

Mint Water
Unfortunately there is no way to hold on to this recipe.  But you can continue to make it all winter long to remind you of the refreshing taste of summer.

1 Lemon
2 Limes
Fresh Mint

Slice the lemon and limes.  Clean the mint and then to release the flavor place it between your palms and slap them together once or twice.  You can put the whole stem in or remove the stem and just use the leaves.  Add ice cubes and water.

To make this better, use sparkling water.

To make this even better, add vodka to create a delicious fresh, low calorie cocktail.

What makes this bite better?
Cooking with herbs infuses food with tons of flavor that's healthy!  There is no need for extra salt, cream, butter, oil or cheese in food that is well seasoned with herbs.  Learning how to cook with herbs is a great way to create healthy, fresh meals.  In addition, many alternative schools of medicine rely on herbs for their medicinal purposes.  Great flavor and an overall health boost- can't go wrong with that!

Lots of recipes with these pestos will follow :)

Thursday, September 9, 2010

Better Breadcrumbs


Have you ever thought about how sliced bread is able to stay on the self in the grocery store for so long?  Most people probably haven't.  But I have.  I have decided recently, after my last bread buying excursion, that I was going to abandon prepackaged bread for good.  It's too confusing to see which bread is really made of whole wheat flour (most breads have some whole wheat flour but are mostly enriched white flour);  to search labels for added sources of sugar (aka high fructose corn syrup); and to ponder the fact that sliced bread can sit on the grocery store shelves for a month, and then on my counter for another two weeks, without going bad.  I'll say no thanks to the highly processed, preservative drenched loaves for now.   It all makes me a little uneasy.

The solution- I buy only fresh baked loaves from the bakery or I get them from the bakery at work.  I know they use whole wheat flour and lots of nuts and seeds.  Yum.  However, when you are not cooking for a crowd and you do not eat every meal at home, it is hard to go through a whole loaf before it goes bad.  So what to do with all the extra bread?!  When life hands you fresh baked bread....make bread crumbs.

The breadcrumbs in this post are made from a multigrain, multi seed boule.  Actually, the leftovers from my breakfast bruschetta.   In addition to being resourceful, these homemade breadcrumbs are super delicious thanks to the extra essence from the nuts and seeds in the loaf.

I really only use breadcrumbs to make chicken cutlets.  However, chicken cutlets are one of my favorite foods so I needed to test out my new better breadcrumbs to see if they could hold up to the packaged ones.  I also baked the chicken in the oven to prevent having to use lots of excess oil.  Not only did the chicken cutlets stand up to my expectations, they surpassed them.  The proof is in the chicken cutlets- the better breadcrumbs really are "better."

Better Breadcrumbs

Whole wheat or multigrain bread preferably with nuts or seeds (if not, you can add some)

I make breadcrumbs with excess bread or bread that is about to go bad.  However, you can make them with a fresh loaf.

Bake the bread until it is crispy to the touch and all the moisture is removed, but don't burn it.  Then place the bread crumbs in a food processor.  That's all-super simple!  Store them in an air tight container.

Chicken Cutlets

Better Bread crumbs, about 1 cup
4 Chicken breasts, trimmed and pounded to an even thickness
1 egg
1/4 cup parmigiano reggiano cheese, grated
1 Tablespoon parsley, chopped 
salt 
pepper

Clean and trim the chicken and then pound it to make sure all the pieces are of even thickness.  Spray olive oil on a glass baking pan.  Mix the parmigiano reggiano and parsley into the breadcrumbs.  Scramble the egg and place it in a separate dish.

Dip the chicken into the egg and then into the breadcrumbs.  Coat well on both sides and place in the glass dish.  Do not overlap or layer the pieces of chicken.  Bake at 350 degrees for about 20 minutes, depending on the thickness of your chicken.  Make sure to wash your hands and all surfaces that have touched the raw chicken.

What makes this bite better?
Rather than eating breadcrumbs made from highly processed refined flour, these breadcrumbs are made from a multigrain loaf and include nuts and seeds to up the nutritional value.  This not only adds a nice flavor, but also more vitamins, minerals and fiber.  Rather than frying the chicken cutlets, baking them saves tons of calories and time.

Tuesday, September 7, 2010

Strawberry Skewers


I decided to celebrate my Labor Day by sleeping until noon, tackling an endless pile of laundry and making reservations at an awesome NYC restaurant that I can't normally get into when beach weekenders and hamptonites are back in town.  But that is not what most people did to celebrate their holiday.  Most people's holiday was marked with BBQs and parties.  This got me thinking about the typical foods that people tend to bring to a summer party- dips, veggie platters, pasta salads, hot dogs, hamburgers and my favorite- the fruit salad.  I love the fruit salad because it is someone's helpless attempt at making sure there is something "healthy" to make the spread of mayonnaise and meat based selections less offensive.  And without fail, there is always at least one person who chooses the fruit salad over all the other desserts to try and negate the fact that they spent the entire day eating crap and drinking.  Now, I'm not saying that fruit bowls don't have a place at summer BBQs.  I'm saying that I think people should put a little more thought and creativity into the healthy options to make it just as appealing as Aunt Sue's homemade brownies topped with fudge and M&Ms.

So, I give you Strawberry Skewers!  This fruit dish is sure to wow at any party- summer or not.  It's flavorful, fun to eat, easy to make and hits the healthy spot on the nose. 

Strawberry Skewers
Modify based on size of party

1 pint of fresh strawberries- tops removed, halved
1 Tablespoon of balsamic vinegar
1 lemon- 2 tablespoons of juice, 1 slice for garnish and zest for finish
1 container of Mascarpone cheese
2 Tablespoons of honey
Black Pepper
Toothpicks

Wash and cut the strawberries in half.  Preserve the tops for the skewers.  Marinate the strawberries in 1 tablespoon of balsamic vinegar in the refrigerator for about 15 minutes.  Combine the mascarpone cheese, lemon juice and honey.  Whip to create a dip texture.  Place in a bowl with a lemon slice garnish and keep it cool while you make the skewers.  You can use toothpicks for small bite skewers or large griller skewers.  Place the tops of the strawberries on the skewer as a garnish.  Put strawberries onto the skewers and arrange on a plate.  Do not stack the skewers.  Ground black pepper to  lightly sprinkle over the strawberries.  Finish by adding a sprinkling of lemon zest.  Serve with the mascarpone dip and enjoy :)

What makes this bite better?
Let's be honest- most people skip the fruit bowl because they find it boring.  Why have a melon when you can have cake?!  But if you can have fruit in a form that is just as yummy and appealing as a cupcake, you're more likely to choose it, enjoy it and skip the other sweets. No one likes dessert guilt.  Be the one who brings the guilt free dessert to the party- you'll be a hit!

Thursday, September 2, 2010

Going Green

"Going green" is buzz term right now that everyone seems to be dropping.  In an effort to "go green" you might have bought energy saving light bulbs, sworn off disposable water bottles or committed yourself to a completely local diet.  But, sustainable living is not the only important aspect of "going green."  Another important place to "go green" is on your plate!  What was the last green food you ate?   Green vegetables provide essential vitamins and minerals to the diet and are often considered to be the most nutrient dense.  This means you get lots of nutrients in very few calories.  Green vegetables are also very high in phytonutrients.  So, make your efforts extend from your earth friendly practices to your healthy plate practices and "Go Green!"

In this recipe, the kale provides lots of antioxidants and vitamins A, C and K.  It is one of my favorite greens for its texture boasting a firm stem that offers a crispiness and curly leaves that do not easily wilt.  During this time of year, kale will have a more bitter flavor but after the first frost will become sweeter and will remain available through the winter. Adding walnuts to this dish provides a nice texture and delicious nutty essence.  If you have never cooked tofu before, the trick is to cook it in a separate pan, using just a little bit of olive oil, to get it to crisp lightly on the outside.  If not, it will be a mushy mess and break apart.  You can also add chicken to this dish if you prefer it over tofu.

What makes this bite better?
Often times people have the good intention of "eating green" but they are overwhelmed by the selection of leafy greens presented to them at the grocery store or green market.  This recipe makes it easy-try kale.  And once you have tried kale, you can substitute any other leafy green into this recipe.  Cook it over and over again with spinach, swiss chard or collard greens.  Even better, if you have always by passed tofu because it freaks you out, try that too.  It's a recipe full of new foods for most people, and that in itself is awesome.  Secondly, kale is packed with vitamins and minerals making it a one of the healthiest, most nutrient dense greens available.  And if you like it now, you can continue to eat it all through winter.

Kale and Tofu with Walnuts
Makes 2-3 servings

1 bunch of fresh Kale
Olive Oil
1 small onion, sliced thin
3 cloves of garlic, minced
1 pack of extra firm tofu in water, rinsed, patted dry with a paper towel and cubed
About 1/2 cup of chopped walnuts

Drizzle a little bit of olive oil to lightly coat the bottom of a pan, or lightly spray with cooking spray.  Place the tofu in the pan so all the tofu is touching the bottom of the pan to brown.  Cook over medium heat, rotating sides so the tofu crisps nicely on all sides.

In a separate saute pan, drizzle olive oil in the pan and sauté onions and garlic until they begin to brown slightly.  Wash the kale under cold water, remove the thick part at the base of the stem and cut into chunks about 2-3 inches in size.  Place the kale into the pan and rotate until it begins to cook down.  If extra moisture is needed, add water in small amounts to help steam down the kale.  Cook for about 5 minutes until the kale is soft but not wilted or mushy.  Add the walnuts and tofu and toss to allow the flavors to blend.  Salt and pepper to taste.  Serve and Enjoy :)