Pages

Thursday, April 28, 2011

Whole Wheat Penne with Tilapia, Arugula and Balsamic


I love sauces, dips, dressings and marinades.  They add the most exciting flavors to food but they can also make or break the nutritional value of a dish.  The dressing in this dish is one of my favorites not only because it's healthy and flavorful but because of its versatility.  I use it as a salad dressing to snazz up spinach or as a marinade on chicken, fish or shrimp.  I also love to use it as a sauce in a stir fry or in this case, a pasta.  It is sweet yet tangy and you can control the spice.  

I rarely measure anything when I cook (flaw) but below are my rough estimates.  You can modify based on your preferences and the size of the dish you are making.  The amounts given are appropriate to make this pasta dish.  I used an awesome aged balsamic vinegar that I have and it is sweeter and has a thicker texture.  You can use a regular balsamic but you might want to add additional honey.  Taste as you go.  This dish can be enjoyed hot or cold. Be sure to make a bit extra to drizzle on top of the pasta as you serve it!
Balsamic Dressing with Crushed Red Pepper and Scallion

3-4 tablespoons olive oil 
1 tablespoon Balsamic Vinegar
Juice from 1/2 lemon
1 tablespoon honey
1 teaspoon crushed red pepper
1 stalk scallion, chopped
What makes this bite better?
I am a huge fan of one dish wonders.  Whenever a dish has lean protein, fiber and veggies it's a hit in my book. In addition to the health benefits of fish and olive oil, arugula is a star in this dish.  Arugula is an amazing green because it's easy to add to hot and cold dishes.  It is actually in the brassica family making it a relative of kale, broccoli, brussels sprouts and cabbage.  It is loaded with Vitamins A, C and K as well as calcium and other minerals. Eat it as often as you can, cooked or raw. 


 Whole Wheat Penne with Tilapia and Arugula
1 box whole wheat penne
1 pound tilapia filets
2 cups arugula
Dressing (above), divided
Scallion (optional)
Crushed red pepper (optional)
Salt to taste

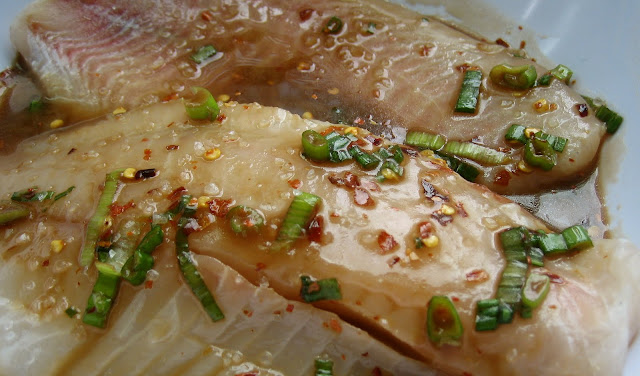
Marinate the tilapia filets in the dressing, using about half the quantity of dressing.  In a large pot, bring water, olive oil and salt to a roaring boil and cook the pasta.  Heat a separate pan over medium.  Cook the tilapia filets until they are cooked through.  Gently break apart the filets into bite size pieces.  Add the additional sauce and allow to simmer for about 5 minutes.  Add a ladle full of water from the pasta to the pan to create more sauce.  Drain the pasta and return it to the pot.  Add the raw arugula and a drizzle of olive oil to the pasta and toss.  Add the fish and sauce and toss to coat well.  Finish with additional fresh scallion, crushed red pepper and additional dressing if desired.  Serve and enjoy :)

Friday, April 22, 2011

Spinach Salad with Chickpeas, Almonds and Sun-dried Tomatoes


The holidays are upon us.  If you are celebrating Passover you have abandoned bread and been reminded of how much you truly love beer.  Maybe you are fasting and swearing off meat in anticipation of Easter.  Or perhaps you just believe in trees and Mother Earth and are celebrating Earth day by eating local, sustainable and low carbon emission foods. Either way you look at it, meal planning this week has some limitations.  This salad is a great option to get you through your bread less, meat less, eco-friendly journey.  It is one of my most favorite salads and I make it almost every week.  You can use goat cheese or feta cheese.  Goat cheese will create a creamy dressing when mixed so it's a healthy substitute if you normally douse your salad in fattening creamy dressing.  Regardless of your beliefs, this week is sure to be full of celebrations with food, family and friends so a light, easy salad is ideal leading up to or following your festivities.

What makes this bite better?
When creating healthy dishes, it is important to balance flavor, color and texture so the food is not only healthy, but appealing.  This salad is so satisfying because it is the perfect combination of fresh flavors, creaminess from the cheese, and crunch from the almonds.  In addition, there are many studies linking chickpea (garbanzo bean) consumption to satiety due to the high content of insoluble fiber found in chickpeas and we all know the important benefits of foods high in insoluble fiber. Chickpeas also provide the necessary protein and fat so there is no need for meat.  Buying canned chickpeas is the easiest and quickest option, just be sure to buy low-sodium if possible to avoid excess sodium intake.  Either way, rinse the chickpeas well under water before using them in the salad.


Spinach Salad with Chickpeas

2 cups organic spinach
1/2 cup low sodium chickpeas
1/4 cup chopped sun-dried tomatoes
1/4 cup goat cheese (or feta) (local and organic if possible)
1/4 cup sliced almonds
1/2 tablespoon extra virgin olive oil
about 1/4 tablespoon fresh squeezed lemon juice (I just squeeze a slice of lemon to taste)
salt and pepper to taste

Clean the spinach and lay on a paper towel to dry.  Add all the ingredients.  Toss to combine.  Serve and enjoy :)

Thursday, April 21, 2011

Braised Pork with Rosemary

The other day I was really in the mood to braise something.  I crave braised foods when I want a savory and comforting dish.  If you are nervous about cooking meat, braising is a fool-proof technique for beginner cooks because it's nearly impossible to mess up.  It creates food that is melt in your mouth delicious and uses minimal fat.

Braising is a combination cooking method that uses both dry and moist heat.  This is ideal for lean cuts to become flavorful, tender and moist.  The meat is first browned and is then cooked in a liquid that becomes the sauce for the meat.  The meat should be fork tender but not falling apart.  Braising is also convenient if you are busy.  You can prepare the dish and then let it cook while you go to the gym and get your laundry done.


What makes this bite better?
Pork always gets a bad rap, especially when it comes to healthy eating.  But pork tenderloin has less fat than chicken. Using a cooking method like braising allows you to infuse lean cuts with flavor and moisture without having to use fatty cuts or excess fat in the preparation.  Pork is a great source of lean protein and is also an excellent source of the B vitamins and other nutrients like iron and zinc.  In addition, this dish uses rosemary and sage to add flavor.  Herbs are loaded with phytochemicals and fresh herbs have been shown to pack more antioxidant power than dried herbs.  

Braised Pork Tenderloin with White Wine Rosemary and Sage
1 pound Pork Tenderloin
1 small white onion, diced
2 pieces garlic, minced
Fresh rosemary (5-6 sprigs)
Fresh sage (half the amount of fresh rosemary)
1 cup white wine
Extra-virgin olive oil

Drizzle olive oil and heat to medium-high.  Do not allow the olive oil to smoke.  Trim the tenderloin of excess fat and cut into pieces if necessary to fit into the pan.  Salt and pepper each side of the pork and place in the pan with half of the sprigs of fresh rosemary.  Allow each side to cook until golden brown, about 3-5 minutes.  Remove from the pan.  In the same pan, add diced onion, minced garlic, fresh rosemary and fresh sage and saute until translucent.  Add one cup white wine and stir gently to remove any caramelization that has accumulated in the pan.  Return the pork to the pan and cook uncovered until the white wine reduces by about half.  Reduce to a simmer, cover and cook for at least 1 1/2 hours. Remove the pork from the sauce and allow it to rest for 10 minutes or so.  Slice it and pour the sauce from the pan over the pork.  Serve and enjoy :)


Thursday, April 14, 2011

Easter Eggs


I get a little carried away with food traditions during holidays and Easter is no exception.  Even when I was little, I would be incredibly meticulous about dying easter eggs.  We would buy the egg dying kits with the wire hooks and wax crayons and I would always be frustrated by how limited my creativity was.  I would sit and carefully balance one half of an egg in purple and then flip the egg to make the other half perfectly red.  Creating intricate invisible messages with my wax crayon would lead to anticipation and anxiety as I waited to see how it turned out.  All my sister's eggs would wind up being variations of green or brown because she would lose patients after 10 seconds and dip the eggs in all the colors.  This drove me crazy.

I don't know why the idea never occurred to me until now, but this year I thought to use water colors to paint my Easter eggs.  I'm sure at this point they have a kit that does this for you.  But every once in a while I think it's important to act like a kid again.  So whip out a paint brush and make a mess.  These pretty eggs will brighten up any Easter brunch, serve as a great center piece for Easter lunch or make unique place settings for Easter dinner.  And you thought dying eggs was only for kids?!


Water Color Easter Eggs
1 water color kit (non-toxic)
1 dozen eggs

Hard boiling Eggs: Bring enough water to boil in a pot that it will cover the eggs by 1-inch.  Once the water comes to a boil, use a spoon to place the eggs in the water.  Once the water begins to boil again, reduce to a simmer and allow to cook 8-10 minutes.  Drain and allow to cool.

Make sure the eggs are completely cool and dry before you paint them.  Save the carton to place the eggs in after they are painted.  Store in the refrigerator.  Serve and enjoy on Easter :)

What makes this bite better?
Hard boiled eggs are a great source of protein and fat in the morning.  I will throw 2 or 3 in a bag with a piece of fruit as a quick breakfast on the go.  I usually eat one egg yolk per two egg whites.  For Easter, these perfectly pretty eggs are a better snack than an egg shaped chocolate or marshmallow.

Thursday, April 7, 2011

Peanut Butter Balls


When it comes to eating healthy, for me, some of the most difficult challenges come during snack time.  Should I hit the vending machine? Is it possible to find a snack that doesn't have high fructose corn syrup in it?  Should I really spend $3.99 on a power bar I don't really want?  Do peanut M&M's count as a source of protein?  Should I feel guilty about eating 2 bags of 100 calorie Oreos?  Is there an ingredient in a bag of Doritos that actually counts as food?

Oh the dilemma.  Snacks have always been tricky for me, but necessary.  Like most people I often fly through the day and count on snacks (and coffee!) to sustain my energy levels between meals.  That's why I created these delicious little power protein peanut butter balls (I dare you to say that 3 times fast).  They are the perfect snack.  No processed sugar and no artificial ingredients plus protein, sweetness and whole grain.  Ah, the perfect solution!

I make these snacks based on what I'm craving for the week.  I use peanut butter or almond butter depending on what I have.  Almond butter is not as sweet or creamy as peanut butter so most people will prefer peanut butter.  I add mini chocolate chips when I want some chocolate or roll them in coconut flakes when I'm feeling creative.  When I'm feeling adventurous, I add both.

Peanut Butter Balls
Makes 8-10
1/4 cup peanut butter (or almond butter)
1 cup oats
1 Tablespoon water
1 Tablespoon honey
1/4 cup mini chocolate chips (optional)
Shredded coconut flakes (optional)

Mix the peanut butter, oats, water and honey in a bowl and mix well.  If you are using mini chocolate chips, mix them in as well.  Form the mixture into 1-inch balls using your hands.  You might need to squeeze the mixture together to get it to stick and then gently roll it between your palms to create a smooth ball shape.  The technique is just like making meatballs.

If you are using coconut flakes, pour them onto a plate or piece of wax paper and roll the ball until it is completely coated.  Place on a piece of wax paper and refrigerate for at least 15 minutes before eating.  Store in the refrigerator.

What makes this bite better?
When choosing a snack, you want to make sure that it has a balance of protein, fat and carbohydrates to keep you full and energized.  The combination of nut butter and oats provide the perfect ratio.  In addition, whenever you enjoy a sweet snack, adding fiber helps regulate the impact of the sugar on your blood sugar levels.  The oats in this snack will slow the absorption of the sugar to prevent a spike in blood sugar that would lead to a crash in energy levels.