Pages

Sunday, December 1, 2013

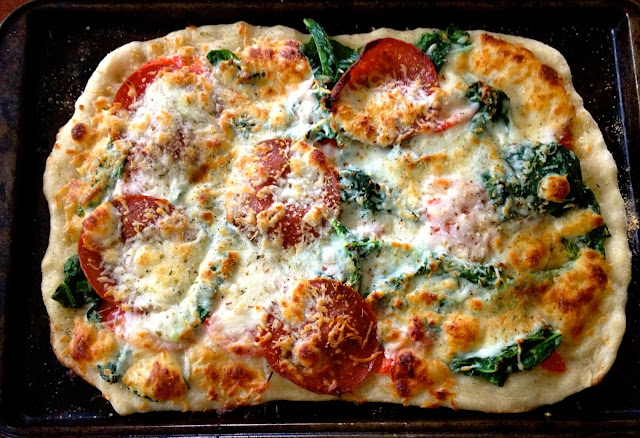
Pizza with Broccoli Rabe, Pepperoni and Mozzarella


Who doesn't like pizza? No one fun, that's for sure.  I love making pizza, not only because it's a crowd pleasing comfort food but also because it's an easy way to use up ingredients in the fridge. Here's a simple, delicious idea for this weekend's menu.


I used to make my own homemade pizza dough. Though those pizza making parties resulted in great stories (one instance involved me going to the hospital and getting stitches courtesy of a prosecco explosion), they didn't always result in great pizza.  Now, I take the easy road and pick up pre-made dough.  Trader Joe's and Whole Foods both sell ridiculously cheap dough and most grocery stores and pizza shops will sell you dough if you ask.  Grab whatever ingredients you have in the fridge and throw it on there!
While I haven't mastered the dough, I have mastered cooking a perfect pizza.  These tips will ensure you have the perfect crispy crust:
  1. Turn the oven to the highest heat (not broil). The hotter the oven, the crispier the pizza
  2. Sprinkle a baking sheet or pizza stone with corn meal.  This will prevent the pizza from sticking.
  3. Press the dough into the baking sheet or pizza stone, as thinly as possible.  If you create little holes in the dough, just patch it back together.  Thinner is better.
  4. Brush olive oil over the dough before placing all the ingredients
  5. Add any ingredients you like! Pre-cook vegetables and if you add tomatoes remove excess liquid to avoid making the dough soggy.
  6. Don't forget salt and pepper! (and oregano if you like it)
  7. Cook for 8-10 minutes keeping an eye to avoid burning.
To make this pizza:
  • First sauté broccoli rabe with olive oil and garlic
  • Buy local pepperoni.  Always ask at the meat/cheese counter if they have other pepperoni/meat options besides the pre-packaged processed stuff; you only order what you need and it's usually cheaper!
  • Thinly slice tomatoes (I used the last of the jersey summer tomatoes I had..) and remove excess liquid before adding to the dough
  • Top with shredded cheese, salt, pepper and oregano
  • Bake according to instructions above
  • Finish with Parmesean cheese and enjoy!
Friday, September 6, 2013

Blueberry and Peach Crumble

(a favorite, reposted from August 2011)
Everyone loves to hate New Jersey.  The state proudly boasts ownership of The Jersey Shore (which you know is your guilty pleasure), Newark Airport and plenty of nuclear power plants and oil refineries.  But there are some things you don't know about New Jersey.  I bet you didn't know that New Jersey is the blueberry capital of the world?!  Well, it is.  I am from South Jersey and I often feel the need to defend the states integrity.  We have farms stocked full of your summer favorites- peaches, tomatoes, zucchini and corn. We have produce stands and apple picking and you got it- lots of blueberries!

Blueberries define summer and before they slip away into the frost, I wanted to feature them with their perfect summer mates, peaches.  This recipe is easy, oh so sweet and a perfectly healthy summer dessert.  New Jersey, we thank you for your fresh summer fruit.

Blueberry and Peach Crisp

1 pint of fresh blueberries, cleaned
5 (or more) sweet summer peaches, cleaned and sliced
Lemon Juice, from 1 fresh lemon
1 tsp. Cinnamon
1/4 cup Vegetable Oil
1/4 cup light brown sugar, loosely packed
1 1/2 cups oatmeal

Combine the blueberries and peaches and toss in fresh juice from one lemon.  Pour into a glass baking dish and let sit while you prepare the topping.  In a pan, heat the vegetable oil over medium heat.  Add the brown sugar and stir until it is dissolved, ensuring there are no clumps.  Add the cinnamon and stir.  Add the oatmeal about 1/2 cup at a time, completely coating in the oil mixture.  Once the oatmeal has completely absorbed the oil, pour over the peaches and blueberries.  Bake for about 15 minutes at 350 degrees.  Once the blueberry juice has created a sauce and the peaches are soft, but not mushy, it's done. Let it rest for about 5 minutes before serving.

What makes this bite better?
Blueberries are a power food!  They are stuffed full of antioxidants, vitamins and minerals and have been shown to reduce abdominal fat and risk of disease.  Plus, they are delicious!

Friday, July 12, 2013

Breakfast Bruschetta


One of my culinary flaws is that I really do not like raw tomatoes.  I know, I know.  Considering how beautiful and tasty they are-it's shocking.  My mom and sister eat them with salt like they are peaches.  Not me.  I love tomatoes that are cooked, or thoughtfully integrated into dishes and salads.  But on their own, there is only one way I will eat them-in season, with basil and olive oil. Since tomatoes are so good for you, and perfectly in season, I have been trying to think of news ways to get them into dishes.  This breakfast bruschetta is the perfect way to start your summer day.

Breakfast Bruschetta
To determine portion size, estimate about 1-2 tomatoes per person.  This recipe is for a single serving.  I used a Multigrain Boule with seeds as my bread. Avoid using sandwich bread- it will turn to mush under the tomato mixture.  Use a fresh baked loaf from the bakery preferably with whole grains, nuts and seeds.

2 Tomatoes
1 clove of garlic, minced
Olive Oil
Fresh basil, sliced (note: do not use dried basil for this recipe)
Multi grain boule, sliced into about 1 1/2 inch thick pieces
1 egg
Salt and pepper to taste

Dice the tomatoes, place them in a bowl and add the minced garlic.  Drizzle enough olive oil to coat, about 1-2 tablespoons.  Add salt, pepper and basil and toss to coat.  Set aside and allow the tomatoes to marinate while you prepare the rest of the dish

Cut the bread into a slice about 1-1 1/2 inches thick. Toast the bread or bake for a few minutes until golden brown.  Cook one egg to your liking.  For this recipe I recommend an egg that still has a yolk-over easy, sunny side up or poached would be best.

Assemble the bruschetta by spooning the tomato mixture onto the toast.  If you cut a thicker piece of toast be sure to spoon some of the juices from the tomatoes to saturate the bread.  Top with the egg.  Serve and enjoy  :)
What makes this bite better?
It's true- breakfast is the most important meal of the day.  And unfortunately, it's the meal most people skip.  Or the meal during which they make pretty lame food choices.   It is important not only to eat breakfast, but to eat a breakfast that is balanced.  A breakfast high in carbohydrates alone will not sustain you for very long.  Carbohydrates are the first to be burned up and used by the body and directly impact your blood sugar levels.  This is why if you eat a piece of toast, or cereal, your stomach will be roaring by 10am.  It is also likely that you will feel your energy levels slip as your blood sugar levels spike and then drop.  So, you want to have a meal that is balanced in carbohydrates, protein and fat.  This will keep you fuller longer and help regulate your blood sugar levels.  This meal integrates fat and protein through the egg and olive oil creating a perfect balance for a great weekend brunch!

Tip
This is a great breakfast to serve when you are having guests or serving breakfast for a lot of people.  Rather than dishing out pancakes or tons of french toast, serve up this healthier, and in my opinion easier, breakfast.

Friday, June 14, 2013

The Best Burger


My Dad, like most dads, is simply awesome.  In honor of our favorite cool, calm hero we never go out or plan a busy day; we grill and chill. Last year for Father's day I made burgers from scratch and rocked my Dad's world.  This year, sadly, I can't be with him so I'm reposting this idea for all those lucky folks who get to see their Dads this weekend.  Make the man a burger. 

The trick is to use freshly ground beef, not the processed, filler-laden, pre-packaged junk. I was happy to have an excuse to convince my mom to let the butcher freshly grind my hand-picked cuts of beef. If it had been any other Sunday she might have "sssshhhed" me and told me it's the same difference.  Well, it's not.  The butcher is usually thrilled to talk about different cuts and to grind your pickins'. 

I have read lots of different suggestions about which combinations of cuts yield an ideal burger.  If you feel like experimenting, you can check out some options here.  If you are lazy, you can follow in my footsteps and ask the butcher which cuts are the freshest and will create ideal ground beef for a burger (80% lean, 20% fat is the standard).  Obviously, it would be dumb to take an expensive cut like filet mignon and ground it up, so don't do that.  Chuck and sirloin work wonderfully (I use 50/50) and they are usually on the cheaper side of the steak spectrum. Score. Class it up, buy some nice rolls and killer cheese (cheap potato rolls with high fructose corn syrup don't count- think brioche and cheddar) and all the other fixins' your Dad enjoys.  

To make the burgers, you only need salt and pepper.  Make the patties by hand, salt and pepper each side and push a thumb print into one side.  If your dad is king of the grill, let him to cook them to perfection! You may even want to allow him to take credit for how awesome those burgers are.  It is father's day after all...

What makes this bite better?
Ground beef is often highly processed and chock full of fillers and preservatives. This not only affects the quality and nutritional value of the meat but also the way the meat renders and caramelizes. In order to make a delicious, preservative-free burger, ask your butcher to freshly grind your steak at the store. If you have a meat grinder (lucky duck) you can do it yourself. If not, your butcher is usually more than happy to do it for you. They also usually share a bit of knowledge and will remember you the next time! Double bonus!! 

Enjoy every bite :) 

Friday, May 24, 2013

Grilled Chicken Burgers


Happy Friday of Memorial Day weekend!  Not only does Memorial Day officially kick off summer but it marks the start of all the great things that come with it- grilling, swimming, traveling and finding any reason to spend more time outside.  As far as summer cooking goes, I love grilling! It makes for the most delicious meals and preparation couldn't be any easier.  However, I am always looking for red meat and sugar-ladened bun alternatives.  That doesn't mean I don't enjoy a good burger every now and then but every weekend for the next 3 months won't exactly qualify as moderation. I plan to share lots of grilling ideas but last night I tested out a recipe for chicken burgers and they rocked! They are so tasty you won't miss the red or processed meats filling up everyone else's grills this weekend.  Grilling up lots of veggies guarantees you get your daily intake while not waisting wasting calories on nutritionally empty sides like potato chips or macaroni salad.

We topped our burgers with a tangy horseradish cheddar and fresh avocado.  No need for ketchup or mustard!  We also grilled up some carrots and zucchini and heated spicy bok choy on a foil pan. Enjoy every bite :)

What makes this bite better?
The average cheeseburger can have over 300 calories and 20 grams of fat, 10 grams coming from saturated fat (that's not including the bun and toppings!).  Additionally, high red meat intake is linked to cardiovascular disease and finding healthy substitutions to reduce intake is ideal for optimal health.   Chicken burgers are around 150 calories and have less than 10 grams of fat, with only about 3 grams coming from saturated fat.  You can cut even more calories and fat if you choose 98% lean all white-meat ground chicken. 


Grilled Chicken Burgers 
1 pound ground chicken 
2 cloves garlic
1 spring onion or scallion (shallots or regular onions will also work in a pinch)
1/4-1/2 teaspoon cayenne pepper (depending on spice preference)
1 teaspoon salt
1 Tablespoon olive oil 
pepper to taste

Remove the roots from the bottom of the spring onion and finely chop 2-3 Tablespoons, including the white onion and the green stem.  Finely mince the garlic.  Add all the ingredients to the ground chicken and combine well. Form into burgers and cover in plastic until ready to grill.  Be sure not to allow other ingredients to come into contact with the raw chicken.  1 pound of ground meat will make 4 burgers. Grill on one side for about 5-8 minutes until nicely charred.  Flip and continue to cook until the juices run clear, about 5 more minutes.  Top with cheese, if desired.  

For the vegetables, clean, cut and gently brush with olive oil.  Sprinkle with salt and pepper and grill until tender and charred.    


Monday, May 20, 2013

Basic Granola


I can gauge how good a recipe is based on the reactions of my friends and family. My first batch of granola is still sitting in a plastic bag on my boyfriend's kitchen counter, slowly being incorporated into yogurt.  The second batch, given to my parents, yielded the response "this is better than anything I could make!," a humble lie from my mom who is a very talented cook.  Anything already prepared is better than having to make it yourself; that doesn't mean it's good.  However, the last batch sealed the deal.  I finally figured out the timing so the granola cools at just the right temperature.  My parents and my sister requested some the last time I saw them, which means it finally passed the test.

Though it took a few drafts, the final version of this granola is amazing.  I eat nearly a cup while I'm making it and I snack on it like popcorn every time I pass through the kitchen.  The trick is to remove the granola from the oven just as it starts to turn golden brown.  The pan is hot and the granola will continue to cook a bit more as it cools outside the oven. You can add anything you like after the granola is cooked- dried cranberries, chocolate chips, walnuts, almonds, sesame seeds, flax seeds, pecans- to make your version even better! Enjoy every bite :)

What makes this bite better?
Finding quick, healthy breakfast options is always challenging.  Store bought granola can have tons of added sugar and fat (check the labels!), not to mention that it can be very expensive.  Making it at home is a great way to control what ingredients go into the granola and it is more economical.  This granola is  gluten-free (make sure you get certified gluten-free oats), high in omega-3s (from the addition of the flax meal), high in fiber and completely satisfying.  Make it ahead of time for breakfast all week.  Serve with yogurt and fruit or eat it like cereal with almond milk.

Recipe
4 cups rolled oats
1 1/2 cups unsweetened dried shredded coconut 
1/2 cup flax meal
1 teaspoon cinnamon
1/4 teaspoon nutmeg
1/2 teaspoon salt
1/3 cup honey
1/4 cup oil (any healthy oil will work well)
1 Tablespoon vanilla extract

Pre-heat the oven to 300 degrees. Combine all the dry ingredients in a large bowl.  Heat the honey, oil and vanilla in a small pot on low heat to blend. Add the honey mixture to the dry ingredients and mix well.  Spread evenly onto a large baking sheet.  Bake for 10-15 minutes, tossing the oats as needed to allow for even cooking.  Remove the pan from the oven as soon as the oats turn golden brown.  They will continue to brown as the pan cools outside the oven.  After the granola has cooled, add additional ingredients such as dried cranberries, nuts, seeds or chocolate chips.

Tuesday, May 14, 2013

Oh, Hello.

I was beginning to write a post to share my granola recipe, which I have finally perfected, when I realized I probably owe you an explanation.  A Better Bite has been on hiatus for some time now and despite my efforts to capture and post my new favorite recipes, time has gotten the best of me.  Over the past year I made the transition from New York City, my home for almost ten years, to Chapel Hill, North Carolina.  One week ago today I completed my first year of a doctoral program in Nutrition at UNC. The move was tough at first and they really keep you busy in PhD School (at least that's what we call it!). While that sounds like more of an excuse than an explanation, I am very happy to let you know that I have learned TONS of new recipes and I can't wait to share them.

When I moved south, I thought I could cook.  Then I came to the stark realization that I pretty much only cooked for this blog and the occasional dinner party. While I have always considered myself someone who loves to cook and enjoys sharing food with those I love, I have learned the new art of cooking for the everyday. My favorite restaurants, coffee shops and gourmet grocers are no longer accessible. I was working in restaurants prior to moving but now when I come home from a long day, my favorite chef isn't asking for requests. The frustrations my friends have been sharing about menu planning and grocery shopping finally make real sense.  In New York City, grocery shopping and trips to the farmers' market are novel, as is cooking, for most people. I now know that loving to cook and having to cook are two very different things.  However, thanks to life in the south, I can now say, I do both.

Enjoy every upcoming bite :)